

The Xtensa support is highly experimental and prone to be broken. This description is work in progress.
So far Linux and macOS hosts only, currently most of the work concentrates on the ESP32 variant with the lx6 cores.
Xtensa-FreeRTOS
Preparing FPC
A native FPC development branch ("main" in git; formerly "trunk" in svn) must be installed and working on the system and will be used to compile the xtensa cross compiler. Download the latest development source code for FPC. One straightforward option is to download the code directly from GitLab. Click on the download button the the landing page, this will show different archive file formats to be downloaded. Click on your preferred file format to start downloading:
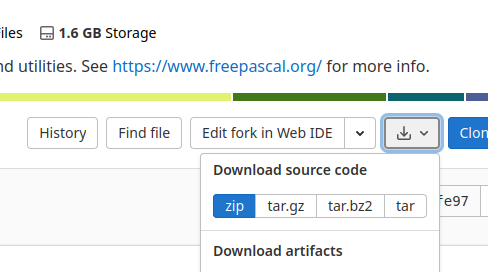
Once downloaded, extract all the files into a folder, such as ~/fpc/main.
Or use git to clone the FPC source repository. Although the clone operation will download a large amount of data, subsequent updates to later revisions will only consume a small amount of data.
Another alternative is to use fpcupdeluxe which automates all the steps below (not extensively tested).
ESP32
Preparations
Install esp-idf based on the instructions given here:
Get Started (for Stable Release)
Follow the instructions to a least step 8 where you build the hello_word demo project.
Copy all the freshly compiled .a files from the current project directory to a directory of your choice:
 mkdir ~/esp/xtensa-esp32-elf-libs
 find . -path ./build/bootloader -prune -o -name "*.a" -exec cp {} ~/esp/xtensa-esp32-elf-libs \;
 find ~/esp/esp-idf/components -name "*.a" -exec cp {} ~/esp/xtensa-esp32-elf-libs \;
Optionally (but recommended) also copy the esp32_out.ld and esp32.project.ld files from the /build/esp32/ folder, or ./build/esp-idf/esp32 and ./build/esp-idf/esp32/ld folders, into ~/esp/xtensa-esp32-elf-libs (with the rest of the SDK libraries). These linker scripts are required when linking a fpc project and needs to be reconstructed if not found by fpc.
Notes:
- Make sure that you are in the directory where you have built the hello_world demo project when executing the find commands above.
- One should not copy libraries from the project/build/bootloader directory, since these libraries do not contain full functionality.
- Some of the required libraries are located in the esp-idf/components folder. Important to also copy the libraries in the ~/esp/esp-idf/components directory if the demo project was copied to outside the esp-idf directory.
Now you are ready to compile fpc and rtl.
execute
export IDF_PATH=~/esp/esp-idf
source ~/esp/esp-idf/export.sh
to get the path and environment set (namely tools path and $IDF_PATH are needed)
Build FPC
Change into the fpc (e.g. ~/fpc/main) directory and run
make FPC=fpc CPU_TARGET=xtensa OS_TARGET=freertos SUBARCH=lx6 "CROSSOPT=-XPxtensa-esp32-elf- -Cfhard" all -jTips & Tricks
If linking fails due to missing libraries, you can search them by (replace missing_symbol by the missing symbol):
xtensa-esp32-elf-objdump -t ~/esp/xtensa-esp32-elf-libs/*.a | grep 'missing_symbol\|xtensa-esp32-elf-libs'fpc doesn't automatically allocate heap space for this target. When using dynamic memory allocation remember to specify a heap size (for example -Ch1024).
Compile and run test program
Create a hello world program:
  program hello;
  begin
    WriteLn('Hello world.');
  end.
in a new folder and compile it with:
~/fpc/main/compiler/ppcrossxtensa -Fu~/fpc/main/rtl/units/xtensa-freertos/ -Tfreertos -XPxtensa-esp32-elf- -O3 -Wpesp32 -Fl~/esp/xtensa-esp32-elf-libs -Fl~/.espressif/tools/xtensa-esp32-elf/esp-2021r2-8.4.0/xtensa-esp32-elf/xtensa-esp32-elf/lib/ helloYou may need to change "esp-2021r2-8.4.0" in the above command to the appropriate release name for your installation.
Different versions of esp-idf require different libraries to link. Use the -WP command line option to specify the version number, e.g. -WP4.3.2.
Get partition-table.bin and bootloader.bin from the hello_world example compiled above and copy them into the same directory as the compiled hello.bin. For the default setup, use:
cp ~/esp/hello_world/build/partition_table/partition-table.bin ~/esp/hello_world/build/bootloader/bootloader.bin .Flash with:
esptool.py -p /dev/ttyUSB0 -b 460800 --before default_reset --after hard_reset --chip esp32 write_flash --flash_mode dio --flash_size detect --flash_freq 40m 0x1000 bootloader.bin 0x8000 partition-table.bin 0x10000 hello.bin- The maximum feasible baud rate depends on the USB-serial chip interfacing with the ESP32 chip, see this link. A baud rate of 921600 has worked successfully for flashing over a CP210x chip.
Monitor the output with:
idf_monitor.py --port /dev/ttyUSB0 hello.elfNote:
- Once the bootloader and partition table has been flashed once one could also just flash the application only:
esptool.py -p /dev/ttyUSB0 -b 460800 --before default_reset --after hard_reset --chip esp32 write_flash --flash_mode dio --flash_size detect --flash_freq 40m 0x10000 hello.binESP8266
Preparations
Install the ESP8266-RTOS-SDK (currently up to v3.4 supported by FPC) based on the instructions given here: Get Started
Follow the tutorial till the test of the hello world program so it is ensured, that everything works.
Copy all the freshly compiled .a files from the current project directory to a directory of your choice:
 mkdir ~/esp/xtensa-lx106-elf-libs
 find . -path ./build/bootloader -prune -o -name "*.a" -exec cp {} ~/esp/xtensa-lx106-elf-libs \;
Optionally (but recommended) also copy the esp8266_out.ld and esp8266.project.ld files from the /build/esp8266/ folder into ~/esp/xtensa-lx106-elf-libs (with the rest of the SDK libraries). These linker scripts are required when linking a fpc project and needs to be reconstructed if not found by fpc.
Notes:
- Make sure that you are in the directory where you have built the hello_world demo project when executing the find commands above.
- One should not copy libraries from the project/build/bootloader directory, since these libraries do not contain full functionality.
Now you are ready to compile fpc and rtl.
Build FPC
Change into the fpc (e.g. ~/fpc/main) directory and run:
make FPC=fpc CPU_TARGET=xtensa OS_TARGET=freertos SUBARCH=lx106 BINUTILSPREFIX=xtensa-lx106-elf- all -jTips & Tricks
fpc doesn't automatically allocate heap space for this target. When using dynamic memory allocation remember to specify a heap size (for example -Ch1024).
Compile and run test program
Create a hello world program:
  program hello;
  begin
    WriteLn('Hello world.');
  end.
in a separate directory and compile it with:
~/fpc/main/compiler/ppcrossxtensa -Fu~/fpc/main/rtl/units/xtensa-freertos/ -Tfreertos -XPxtensa-lx106-elf- -O3 -Wpesp8266 hello -Fl~/esp/xtensa-lx106-elf-libs/ -Fl$IDF_PATH/components/esp8266/lib -Fl$IDF_PATH/components/newlib/newlib/lib -Fl~/esp/xtensa-lx106-elf/xtensa-lx106-elf/lib/ -WP3.4Get partitions_singleapp.bin and bootloader.bin from the hello_world example compiled above and copy them into the same dir as the compiled hello.bin
Flash with:
$IDF_PATH/components/esptool_py/esptool/esptool.py --chip esp8266 --port "/dev/ttyUSB0" --baud 921600 --before "default_reset" --after "hard_reset" write_flash -z --flash_mode "dio" --flash_freq "40m" --flash_size "2MB" 0x0 bootloader.bin 0x10000 hello.bin 0x8000 partitions_singleapp.binMonitor the output with:
$IDF_PATH/tools/idf_monitor.py --baud 74880 --port /dev/ttyUSB0 hello.elfNote:
- Different versions of the SDK may require different libraries to link. Use the -WP command line option to specify the SDK version number, e.g. -WP3.4.
Using both ESP32 and ESP8266
Both controllers use the same ppcrossxtensa compiler, but different versions of the RTL. The default folder structure of fpc does not cater for this, so each time the cross compiler is built, it will overwrite the RTL files in rtl/units/xtensa-freertos. To use both ESP32 and ESP8266 in parallel (i.e. without rebuilding the RTL to switch to a different compiler), the following approach can be used:
1. Once the cross compiler is built, rename the rtl/units/xtensa-freertos folder to rtl/units/xtensa-freertos/$subarch, where $subarch is either lx6 or lx106.
2. Edit fpc.cfg. Locate the line with the path to the rtl (e.g. -Fu~/fpc/main/rtl/units/$fpctarget) and modify it as follows:
 #ifdef cpuxtensa
   -Fu~/fpc/main/rtl/units/$fpctarget/$fpcsubarch
 #else
   -Fu~/fpc/main/rtl/units/$fpctarget
 #endif
Both esp-idf and ESP8266-RTOS-SDK use an environment variable named IDF_PATH to point to the path of the respective SDK. If both SDKs are installed, the path to the desired SDK can be passed to the compiler using the -Ff command line switch. This path is used to locate scripts and linker configuration files - the location of library files still need to be specified using -Fl.
ESP32c3
These comments probably apply to the esp32c5 and esp32c6 as well but untested. The esp32c3 is similar to the esp32 but, under the skin quite different. It uses a RISC instruction set, RV32IMC. It requires a different FPC compiler (ppcrossrv32) and its own compiled RTL. Like the esp32, getting underway involves installing the appropriate Espressif SDK, building its hello-world demo, building a cross compiler from FPC main source and finally copying some necessary library, linker and config files from the Espressif SDK into a place suitable to point our FPCompiler at.
Note: I am sorry, these instructions are very Linux centric. Probably translate to MacOS but will need some work by a Windows user.
Espressif SDK
Espressif provide a good SDK, updating it frequently. Sadly, that makes it hard for FPC (and this documentation) to keep up. At present, its recommended to use the 5.5 SDK, that is current at time of writing but newer ones will definitely appear soon. These instructions assume, unless it says otherwise, that you are using 5.5.
The install uses 5 to 6Gig of disk space. By default, it puts files in $HOME/esp and $HOME/.espressif . You can alter both to support multiple SDK version, read up on how before you install. All instructions below assume you use the default name.
Follow the instructions to a least where you build the hello_word demo project.
To ensure demo builds all the files we need, not just the ones needed for the demo, insert ref to https://forum.lazarus.freepascal.org/index.php/topic,72122.msg564597.html#msg564597
Try it out, load and run it to test your hardware, thats important because it installs the the bootloader and partition table as well as the app. If thats all good move on.
- Make sure you are still in the Espressif hello_world example project directory.
- Grab the txt file from https://forum.lazarus.freepascal.org/index.php/topic,72122.msg564969.html#msg564969 unzip it, rename it get-libs.bash and run it with a parameter of the esp you are using :
$> bash ./get-libs.bash esp32c3Note you will see some warnings about missing files, no problems, they relate to other hardware. The script will create a directory, esp-idf-snapshot were you are now working with the files necessary for an esp32c3. You ca use the same directory for other, similar, chips.
- Now, you must setup some PATHs and environment variables to find all the things we need. This affects the current terminal you are using, need to to it again if you open a new terminal.
 $> export IDF_PATH=~/esp/esp-idf
 $> source ~/esp/esp-idf/export.sh
With those settings use this terminal to build your cross compiler.
Building FPC Cross Compiler
You need the current FPC main source, the code you need is not in any of the release versions.
If you already have the source and are familiar with with the process, perhaps all you need is this command line -
 $> export FPC_DIR=<where you like your FPC installs to live>
 $> make crossinstall FPC=fpc  CPU_TARGET=riscv32 OS_TARGET=freertos  SUBARCH=rv32imc  "CROSSOPT=-XPriscv32-esp-elf-  -Cfsoft"  INSTALL_PREFIX="$FPC_DIR"/fpc-3.3.1
Notes :
- I keep my FPC installs in ~/bin/FPC, its your choice.
- The above assumes you have a PATH to (eg, my case) $HOME/bin/FPC/fpc-3.3.1. Don't try to build this with FPC322 or FPC324.
- You will need to copy the compiler, ppcrossrv32, into the install dir too.
- This will overwrite (eg, my case) $HOME/bin/FPC/fpc-3.3.1/lib/fpc/3.3.1/units/riscv32-freertos but will leave your x86-64 install untouched.
- The above uses the Espressif SDK, specifically in (eg, my case) /home/dbannon/.espressif448/tools/riscv32-esp-elf-gdb/11.2_20220823/riscv32-esp-elf-gdb/bin. So, obviously, you must have installed the Espressif SDK first and you must have used the Espressif script to set you PATH to include that dir. Further, if you change the SDK, you probably need to rebuild the compiler and RTL.
Because I needed to repeat the above process, I wrote a short script to make it a bit easier. Suitable if you don't have FPC main source under git (thats probably easily fixed). You do need FPC-3.2.2 to make the initial fpc331 build, you will probably need to edit the script depending on where your existing install of fpc-3.2.2 is.
 $> cd ~/Downloads
 $> wget https://gitlab.com/freepascal.org/fpc/source/-/archive/main/source-main.zip
 $> wget https://github.com/davidbannon/FPC_Laz_Install/raw/refs/heads/main/FPC_4_esp32c3.bash
 $> mkdir -p ~/bin/FPC
 $> cd ~/bin/FPC
 $> ~/Downloads/FPC_4_esp32c3.bash
Its a slow process, builds and installs the main (ie x86-64) compiler first, then cross compiler. To use that new compiler you must, obviously, add the explicit path when calling it (or set PATH but then you get FPC main all the time).
Building and Flashing hello app
Here is a simple script I use to compile and, if possible flash and monitor the output of a simple hello.pas app. First, the simple source code -
program hello; procedure vTaskDelay(xTicksToDelay: uint32); external; var Count : integer = 0; begin repeat WriteLn('Hello world ', Count); inc(Count); vTaskDelay(100); until false; end.
Note that it runs an endless loop, I found my favorite comms program tio, drops the first (or so) line so an app that delivers just on line appears not to be running !
Here is the script,
FPC_COMP="$HOME/bin/FPC/fpc-3.3.1"
ESP_TOOLS="$HOME/.espressif/tools/riscv32-esp-elf/esp-2021r2-patch5-8.4.0/riscv32-esp-elf
rm hello.bin
# This is the ilp32/no-rtti version
"$FPC_COMP"/bin/ppcrossrv32 -vix -Tfreertos -XP"$ESP_TOOLS"/bin/riscv32-esp-elf-  -O3 -Wpesp32c3 -WP4.4.8 -Fl~/esp448/riscv32-esp32-elf-libs  -Fl"$ESP_TOOLS"/riscv32-esp-elf/lib/rv32imc/ilp32/no-rtti -Fl"$ESP_TOOLS"/lib/gcc/riscv32-esp-elf/8.4.0/rv32imc/ilp32/no-rtti hello
if [ -e hello.bin ]; then
     esptool.py -p /dev/ttyACM0 -b 460800 --before default_reset --after hard_reset --chip esp32c3  write_flash --flash_mode dio --flash_size detect --flash_freq 40m 0x10000 hello.bin
     tio -b 115200 /dev/ttyACM0
fi
Notes
- you will need to set where your FPC main install is. Shown above is mine probably different to yours.
- you will need to set where your espressif tools are, above is default install of a esp_idf 4.4.8.
- I use tio as a comms util, put yours in there instead. (tio work well, to exit press ctrl-T and the Q without the ctrl).
Xtensa-Linux
To use with QEMU
Build binutils
Get binutils-gdb sources, e.g. by
git clone git://sourceware.org/git/binutils-gdbBinutils 2.34 is known to work, so optionally do
git checkout binutils-2_34Copy https://github.com/FPK/binutils-xtensa-config/blob/master/lx6/xtensa-config.h into binutils-gdb/include to configure binutils for the CPU type support by FPC for xtensa-linux. This replaces the original file.
Configure and build binutils with
 ./configure --target=xtensa-linux --disable-gdb --disable-sim --disable-readline --disable-libdecnumber
 make -j `nproc`
 sudo make install
Build FPC
Get latest trunk and build it with:
make FPC=fpc all -j "CROSSOPT=-Cfhard" OS_TARGET=linux CPU_TARGET=xtensaTest FPC
Create a hello world in the FPC top level directory. Compile it with:
compiler/ppcrossxtensa hello.pp -Tlinux -Furtl/units/xtensa-linuxRun it with:
qemu-xtensa ./helloXtensa-Embedded
Emulation and debugging using qemu (ESP32)
Install qemu (from source)
The official release of qemu supports the xtensa architecture but lacks support for the ESP32 and ESP8266 boards. To use qemu with ESP32 (ESP8266 support is not yet officially available) one can use Espressif's port of qemu (refer to this for detail information: https://github.com/espressif/esp-toolchain-docs/blob/main/qemu/README.md).
Automated testing with qemu
For automated testing one needs to return an exit code from qemu to indicate the outcome of a test. One way to achieve this is to call the simcall instruction passing 1 in register a2 and the exit code in register a3:
  procedure qemu_exit(const exitcode: uint32); assembler; noreturn;
  asm
    mov  a3, a2   // copy exitcode value into a3
    movi a2, 1    // set a2 to 1 - exit request
    simcall
  end;