Notarization for macOS 10.14.5+
│ English (en) │ русский (ru) │

This article applies to macOS only.
See also: Multiplatform Programming Guide
This article applies to macOS only.
See also: Multiplatform Programming Guide
Overview
Beginning with macOS 10.14.5 (Mojave), software signed with a new Apple developer certificate and all new or updated kernel extensions must be notarized to run. Beginning in macOS 10.15 (Catalina), all software built after June 1, 2019, and code signed with an Apple developer certificate must be notarized. Notarization is not required for software distributed through the Apple App Store because the App Store submission process already includes equivalent security checks.
Notarization is designed by Apple to give users more confidence that Apple developer-signed software has been checked by Apple for malicious components. Notarization is not an App Review. The Apple notary service is an automated system that scans software for malicious content, checks for code-signing issues, and returns the results. If there are no issues, the notary service generates a ticket to staple to the software; the notary service also publishes that ticket online where Gatekeeper can find it.
When the user first installs or runs software, the presence of a ticket (either online or attached to the executable) tells Gatekeeper that Apple notarized the software. Gatekeeper then places descriptive information in the initial launch dialog to help the user make an informed choice about whether to launch the app.
Code signing an application without also notarizing it is now a totally pointless exercise unless you are only distributing your application via the App Store.
Gatekeeper dialogs
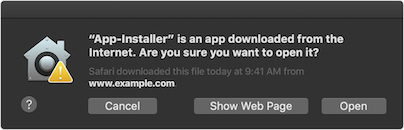
Gatekeeper Dialog before Catalina where an app that is not notarized is first opened (Mojave macOS 10.14 dialog)
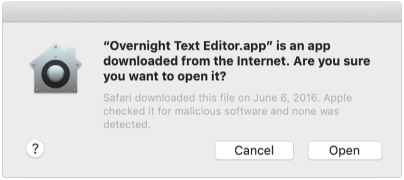
Gatekeeper dialog where an app which is signed and notarized is first opened (Catalina macOS 10.15.1 dialog)
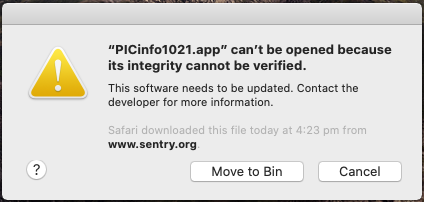
Gatekeeper dialog where an app is not signed nor notarized is first opened (Catalina macOS 10.15.1 dialog)
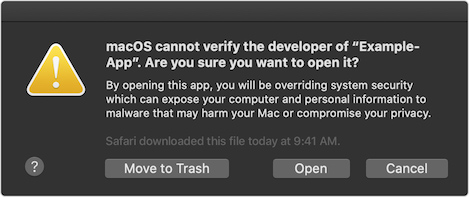
The Gatekeeper "bypass" dialog, accessed by control-clicking on the app (Catalina macOS 10.15.3 dialog)


Notarization requirements
Notarization requires the Xcode command line tools from Xcode 10 or later. Building a new app for notarization requires macOS 10.13.6 or later. Stapling an app requires macOS 10.12 or later.
Apple's notary service requires you to:
- Enable code-signing for all of the executables you distribute.
- Enable the Hardened Runtime capability for your application and command line targets.
- Use a “Developer ID” application, kernel extension, or installer certificate for your code-signing signature.
- Include a secure timestamp with your code-signing signature (include the --timestamp option when running the codesign tool).
- Don’t include the com.apple.security.get-task-allow entitlement with the value set to any variation of true. If your software hosts third-party plug-ins and needs this entitlement to debug the plug-in in the context of a host executable, see Avoid the Get-Task-Allow Entitlement.
- Link against the macOS 10.9 or later SDK.
On 3 September 2019 Apple announced that until January 2020 developers could get new versions of applications notarized even though they were not hardened or fully compliant with the normal requirements. That deadline was later extended to 3 February 2020. The above notarization requirements are now in full effect.
Apple Statement 23 December 2019
In June, we announced that all Mac software distributed outside the Mac App Store must be notarized by Apple in order to run by default on macOS Catalina. In September, we temporarily adjusted the notarization prerequisites to make this transition easier and to protect users on macOS Catalina who continue to use older versions of software. Starting February 3, 2020, all submitted software must meet the original notarization prerequisites.
If you haven’t yet done so, upload your software to the notary service and review the developer log for warnings. These warnings will become errors starting February 3 and must be fixed in order to have your software notarized. Software notarized before February 3 will continue to run by default on macOS Catalina.
As a reminder, all installer packages must be signed since they may contain executable code. Disk images do not need to be signed, although signing them can help your users verify their contents.
Notarizing an application
These instructions assume you have completed the other preparatory steps: code signed the application, implemented the hardened runtime capability, code signed the installer pkg (if you have one) etc.
You can't upload the .app bundle directly to the notary service, you need to create a compressed archive containing the application or you can put applications, kernel extensions, and other software in a container, like a disk image, and notarize the container. The notary service accepts disk images (UDIF format), signed flat installer packages, and ZIP archives. It processes nested containers as well, like packages inside a disk image.
Step 1 - Create disk image
Create a disk image by opening a Terminal and running the following command:
hdiutil create -volname MyApp -srcfolder /path/to/folder -ov -format UDBZ MyApp.dmg
Step 2 - Code sign the disk image
Code sign the disk image by opening a Terminal and running the following command:
codesign -s "Developer ID Application: Your Name (Team ID)" --timestamp MyApp.dmg
Step 3 - Generate an app-specific password
To generate an app-specific password, refer to this Apple Support article. Note: this is a password that will be specific to the notarization application (xcrun altool) and not to the application being notarized. You therefore only need to do this once, but make sure you copy the generated password and save it somewhere.
Tip: Save the password to your keychain with:
xcrun altool -u "<your email>" -p "<app-specific pwd>" --store-password-in-keychain-item "<name for pwd>"
and then you can use "@keychain:<name for pwd>" instead of "<app-specific pwd>" in the following commands.
Step 4 - Upload the disk image to the notary service
Upload the disk image file to the Apple notary service by opening a Terminal and running the following command:
xcrun altool --notarize-app --primary-bundle-id "<your identifier>" -u "<your email>" -p "<app-specific pwd>" -t osx -f /path/to/MyApp.dmg
The primary-bundle-id helps you keep track of automated correspondence from the notarization service. The value you give doesn’t need to match the bundle identifier of the submitted app or have any particular value. It only needs to make sense to you. The notarization service includes the value whenever it emails you regarding the given altool submission.
If the upload is successful you should receive output similar to the following:
No errors uploading 'MyApp.dmg'.
RequestUUID = 3af4e56f-162b-75bc-827f-7233f92bf20c
Step 5 - Check the notarization process
The notarization process generally takes less than an hour, so you may want to check its progress from time to time by opening a Terminal and running the following command:
xcrun altool --notarization-history 0 -u "<your email>" -p "<app-specific pwd>"
When the notarization process completes successfully the above command will return information similar to the following:
Notarization History - page 0

Date                      RequestUUID                          Status  Status Code Status Message
------------------------- ------------------------------------ ------- ----------- ----------------
2019-12-08 06:24:03 +0000 3af4e56f-162b-75bc-827f-7233f92bf20c success 0           Package Approved

Next page value: 1575786243000
You should also receive an email from Apple similar to the following for a successful notarization:
Dear <First_Name>,

Your Mac software has been notarized. You can now export this software and distribute it directly to users.

Bundle Identifier: com.example.MyApp.001
Request Identifier: 3af4e56f-162b-75bc-827f-7233f92bf20c

For details on exporting a notarized app, visit Xcode Help or the notarization guide.

Best Regards,
Apple Developer Relations
Step 6 - Staple the ticket to the disk image
The notarization process produces a ticket that tells Gatekeeper that your application is notarized. After notarization completes successfully, the next time any user attempts to run your application on macOS 10.14 or later, Gatekeeper will find the ticket online. This includes users who downloaded your application before notarization.
After step 5 receives the "Package Approved" status message, you should also attach the ticket to the disk image file using the stapler tool, so that future distributions include the ticket. This ensures that Gatekeeper can find the ticket even when a network connection is not available.
To staple the ticket to the disk image file, open a Terminal and run the following command:
xcrun stapler staple /path/to/MyApp.dmg
If the command completes successfully, the output should be similar to:
Processing: /Path/to/MyApp.dmg
Processing: /Path/to/MyApp.dmg
The staple and validate action worked!
Step 7 - Verify notarization of the disk image
To verify the notarization of the disk image, open a Terminal and run the following command:
spctl -a -vv -t install MyApp.dmg
A successful verification of the notarization process should produce output similar to the following:
MyApp.dmg: accepted
source=Notarized Developer ID
origin=Developer ID Application: <Developer Name> (<TEAM_ID>)
Step 8 - Verify notarization of the application
To verify the notarization of the application, install the application, open a Terminal and run the following command:
spctl -a -vv /Applications/MyApp.app
A successful verification of the notarization process should produce output similar to the following:
/Applications/MyApp.app: accepted
source=Notarized Developer ID
origin=Developer ID Application: <Developer Name> (<TEAM_ID>)
Important: test the application by putting it in the Applications directory. It's treated differently by the Gatekeeper when in the "installed" location.
Notarizing a command line tool
See: Notarizing Command Line Tools for an explanation of doing this for a Free Pascal command line tool (a handy script is provided to automate the process).
Troubleshooting
Notarization upload process
If the notarisation upload process does not go well, you should be able to find a compressed log file in your temporary directory which may shed some light on what happened. You can view it by opening a Terminal and running the following commands (substitute the name of your log file which includes your application bundle-id):
  cd ${TMPDIR}
  gzcat c51ca05f-cf49-405f-be57-26873faab5f6_3073718126753816760org.sentry.myapp-20191231004646-273.itmsp6022059143057318377.log
which, for a successful notarization upload, should look similar to:
 [2019-12-31 19:46:46 AEDT] <main>  INFO: Starting upload for packageName: org.sentry.myapp-20191231004646-273.itmsp
 [2019-12-31 19:46:46 AEDT] <main>  INFO: Thread Pool Configuration: {processors=12, perCoreThreadMultiplier=1.65, coreThreads=6, maxThreads=14, minConnections=6, maxConnections=13, rateLimit=100000000000 KBs}
 [2019-12-31 19:46:46 AEDT] <main>  INFO: Reservation CPUSource113/v4/93/41/ce/9341ce96-e7bc-2577-eaac-4528c888a70d/metadata.xml created for file: (metadata.xml), part count:(1), file size: (538)
 [2019-12-31 19:46:46 AEDT] <main>  INFO: Reservation CPUSource113/v4/93/41/ce/9341ce96-e7bc-2577-eaac-4528c888a70d/MyApp_31122019.dmg created for file: (MyApp_31122019.dmg), part count:(1), file size: (1400933)
 [2019-12-31 19:46:46 AEDT] <RLT-002>  INFO: Starting upload for reservation: (CPUSource113/v4/93/41/ce/9341ce96-e7bc-2577-eaac-4528c888a70d/metadata.xml) file: (metadata.xml/1) size: 538
 [2019-12-31 19:46:46 AEDT] <RLT-003>  INFO: Starting upload for reservation: (CPUSource113/v4/93/41/ce/9341ce96-e7bc-2577-eaac-4528c888a70d/myapp_31122019.dmg) file: (MyApp_31122019.dmg/1) size: 1400933
 [2019-12-31 19:46:47 AEDT] <RLT-002>  INFO: Finished part upload for: (metadata.xml/1) 2.91 KB/s in 0 seconds
 [2019-12-31 19:46:47 AEDT] <RLT-002>  INFO: Finished upload for reservation: (CPUSource113/v4/93/41/ce/9341ce96-e7bc-2577-eaac-4528c888a70d/metadata.xml) file: (metadata.xml)
 [2019-12-31 19:46:47 AEDT] <pool-8-thread-1>  INFO: Reservation committed: (CPUSource113/v4/93/41/ce/9341ce96-e7bc-2577-eaac-4528c888a70d/metadata.xml) file: (metadata.xml)
 [2019-12-31 19:46:49 AEDT] <RLT-003>  INFO: Finished part upload for: (MyApp_31122019.dmg/1) 781.33 KB/s in 1 second
 [2019-12-31 19:46:49 AEDT] <RLT-003>  INFO: Finished upload for reservation: (CPUSource113/v4/93/41/ce/9341ce96-e7bc-2577-eaac-4528c888a70d/MyApp_31122019.dmg) file: (MyApp_31122019.dmg)
 [2019-12-31 19:46:49 AEDT] <main>  INFO: Waiting on reservation commit(s) to finish.
 [2019-12-31 19:46:49 AEDT] <pool-8-thread-1>  INFO: Reservation committed: (CPUSource113/v4/93/41/ce/9341ce96-e7bc-2577-eaac-4528c888a70d/MyApp_31122019.dmg) file: (MyApp_31122019.dmg)
 [2019-12-31 19:46:49 AEDT] <pool-8-thread-1>  INFO: All reservation commit(s) finished.
 [2019-12-31 19:46:49 AEDT] <main>  INFO: 456.36 KB/s in 3 seconds
Notarization process failures
If the when you check you find that the notarization process has failed. For example:
Date                      RequestUUID                          Status  Status Code Status Message
------------------------- ------------------------------------ ------- ----------- ----------------
2020-02-29 13:54:08 +0000 fa2e5d79-cba0-469d-bb27-859a8f081821 invalid 2           Package Invalid
You can retrieve the URL for the notarization log file with the command:
xcrun altool --notarization-info <RequestUUID> "<your email>" -p "<app-specific pwd>"
which should yield information similar to the following:
No errors getting notarization info.

          Date: 2020-02-29 13:54:08 +0000
          Hash: 1b08ea5cdf97eb6fed9b959a549d4b325eb5e90f16538139a29a83f75609d87b
    LogFileURL: https://osxapps-ssl.itunes.apple.com/itunes-assets/[...]
   RequestUUID: fa2e5d79-cba0-469d-bb27-859a8f081821
        Status: invalid
   Status Code: 2
Status Message: Package Invalid
You can then cut and paste the LogFileURL into your web browser and retrieve the notarization process log file which will look something like this:
{
  "logFormatVersion": 1,
  "jobId": "fa2e5d79-cba0-469d-bb27-859a8f081821",
  "status": "Invalid",
  "statusSummary": "Archive contains critical validation errors",
  "statusCode": 4000,
  "archiveFilename": "test.dmg",
  "uploadDate": "2020-02-29T13:54:08Z",
  "sha256": "1b08ea5cdf97eb6fed9b959a549d4b325eb5e90f16538139a29a83f75609d87b",
  "ticketContents": null,
  "issues": [
    {
      "severity": "error",
      "code": null,
      "path": "test.dmg/MyApp.app/Contents/MacOS/MyApp",
      "message": "The executable does not have the hardened runtime enabled.",
      "docUrl": null,
      "architecture": "x86_64"
    }
  ]
}
In the above failure case, it was because the executable had not been hardened.
It is also worthwhile mentioning that it is always worth retrieving the notarization log file to check for warnings which are not yet errors so that you can fix them before they do become errors which prevent successful notarization.
Here is an example of a notarization process log from a successful notarization:
{
  "logFormatVersion": 1,
  "jobId": "fa2e5d79-cba0-469d-bb27-859a8f081822",
  "status": "Accepted",
  "statusSummary": "Ready for distribution",
  "statusCode": 0,
  "archiveFilename": "test.dmg",
  "uploadDate": "2020-03-01T01:50:55Z",
  "sha256": "1945554c24da3bb1d587b7c9f968dcbb925b726f2f663b816301928c06593dd9",
  "ticketContents": [
    {
      "path": "test.dmg",
      "digestAlgorithm": "SHA-256",
      "cdhash": "1d4d033edbecc2baf7ff8ce0fa16691be990595f"
    },
    {
      "path": "test.dmg/MyApp.app",
      "digestAlgorithm": "SHA-256",
      "cdhash": "7f9d54e76f25807e2b425a09684aa8cb54dcd17f",
      "arch": "x86_64"
    },
    {
      "path": "test.dmg/MyApp.app/Contents/MacOS/MyApp",
      "digestAlgorithm": "SHA-256",
      "cdhash": "7f9d54e762c7907e2b425a09684aa8cb54dcd17f",
      "arch": "x86_64"
    },
    {
      "path": "test.dmg/MyApp.app/Contents/Resources/MyApp.help",
      "digestAlgorithm": "SHA-256",
      "cdhash": "b544a32a216578e7805ca93b968377cdd92f7ec6",
      "arch": "i386"
    },
    {
      "path": "test.dmg/MyApp.app/Contents/Resources/MyApp.help",
      "digestAlgorithm": "SHA-256",
      "cdhash": "b544a32a216578e7805ca93b968377cdd92f7ec6",
      "arch": "x86_64"
    },
    {
      "path": "test.dmg/MyApp.app/Contents/Resources/MyApp.help",
      "digestAlgorithm": "SHA-256",
      "cdhash": "b544a32a216578e7805ca93b968377cdd92f7ec6",
      "arch": "x86_64h"
    }
  ],
  "issues": null
}
Notarization check failures
If the notarization process succeeds, but when you check whether your application is properly notarized and it does not pass the notarization check successfully, you can use the Console.app to inspect the log files for information about the rejection (after trying to launch the blocked application). Be aware you should open the Console.app before trying to open your blocked application, otherwise not all messages may be logged. You should choose your device in the left sidebar of the Console.app and check for the process XprotectService in the logs.