fpWeb Tutorial/ru
│
العربية (ar) │
English (en) │
español (es) │
русский (ru) │
Первоначально основано на учебнике fcl-web (в формате PDF) пользователя форума Leledumbo.
Введение
fpWeb - это фреймворк веб-приложений, поставляемый FPC в своем дистрибутиве по умолчанию как часть пакета fcl-web. Сам фреймворк построен на основе функций fcl-web. Фреймворк построен с мыслью о RAD, чтобы эффективно использовать компонентность при создании динамического контента. Предоставляется пакет Lazarus, который может использовать фреймворк методом перетаскивания для управления сеансами и создания контента. В этом руководстве мы попытаемся охватить основные функции fpWeb, чтобы с его помощью можно было создать обычное веб-приложение. Обратите внимание, что это руководство не пытается научить вас HTTP-протоколу, HTML, CSS, JavaScript или манипуляциям с базой данных, поскольку владение протоколом и клиентскими языками должно быть предварительным условием работы для каждого программиста веб-приложений, а манипуляции с базой данных не отличаются от десктопной реализации.
Архитектура (ПОЖАЛУЙСТА, прочтите)
Перед тем, как начать, необходимо знать архитектуру и поток приложения, чтобы избежать путаницы, когда определенные вещи не работают или работают неожиданно. Поэтому, пожалуйста, потратьте немного времени на чтение этого раздела.
Приложение
Под приложением здесь понимается протокол, который будет реализовывать ваше приложение. fpWeb с радостью переключится с CGI, FCGI, с модуля Apache на встроенный сервер и т.д., если fcl-web реализует еще что- нибудь в будущем. Каждое приложение реализовано в своем собственном модуле, поэтому для переключения с одного приложения на другое, за исключением модуля Apache, нужно просто изменить соответствующий идентификатор в разделе uses. В настоящее время (по состоянию на 3.0.0 / 3.1.1) это:
- fpCGI -> CGI
- fpFCGI -> FastCGI
- fpApache (также требуется httpd) -> модуль Apache
- fpHttpApp -> встроенный сервер
- microhttpapp -> встроенный сервер с использованием библиотеки GNU libmicrohttp.
- fphttpsys -> поддержка системой Windows протокола HTTP.
В этом руководстве мы будем использовать встроенный сервер для простоты, потому что вам не придется иметь дело с настройкой виртуального сервера и путаницей со сложным файлом конфигурации и управлением службами. Ваше приложение будет единым переносным бинарным веб-приложением! Другая причина может заключаться в том, что существует больше, чем одно приложение веб-сервера, и каждое имеет свой способ настройки. Было бы излишним пытаться охватить их всех, пока их документация уже выполняет свою работу. Модуль Apache реализован как (динамическая) библиотека, тогда как другие протоколы являются обычным приложением. Каждое приложение может иметь определенные свойства (например, порт), доступные и значимые только для этого приложения. Вот почему, если вы посмотрите на примеры fcl-web, пары .lpi / .lpr для каждого протокола помещаются в свои собственные каталоги, только веб-модули являются общими.
Веб-модули
Приложения fpWeb состоят из веб-модулей, которые фактически создают контент. Веб-модуль может содержать веб-действия, которые могут еще больше разделить функциональность. Например, веб-модуль аутентификации может иметь веб-действия входа и выхода. Хотя модуль about web может вообще не нуждаться в действии и обслуживает только один контент. Веб-модуль интегрирован с fpTemplate, который можно использовать для создания динамического контента из файла шаблона. Это примерно похоже на то, что делает PHP, только разрыв между логикой и представлением скорее вынужденный, чем предполагаемый. Некоторые говорят, что fpTemplate реализует пассивное представление, в то время как PHP по умолчанию реализует шаблон проектирования активного представления.
Установка
Пакет fpWeb для Lazarus по умолчанию не установлен (но идет в стандартной поставке). Чтобы включить fpWeb:
- Откройте Lazarus и выберите Package->Install/Uninstall Package
- В списке Available (Доступно) для установки найдите weblaz и нажмите Install selection (Установить выбранное). Нажмите Save and rebuild IDE(Сохранить и пересобрать IDE) и подтвердите, нажав Continue(Продолжить).
- Позвольте IDE пересобраться и перезапуститься. Если все пойдет хорошо, у вас должна появиться вкладка fpWeb на палитре компонентов, как показано ниже:
Специализированные модули
Класс*TFPWebModule* (используемый ниже) - это простой пример модуля fpWEB, который можно использовать для всех видов HTTP-запросов.
Однако fpWEB поставляется с некоторыми специализированными модулями, которые имеют дополнительную поддержку для специализированных задач:
- Класс TSimpleFileModule в модуле fpwebfile.pp можно использовать для отправки файлов. Вы указываете ему каталог, и он делает все остальное.
- Класс TFPHTMLModule в модуле fphtml.pp можно использовать для создания HTML.
- Класс TProxyWebModule в модуле fpwebproxy.pp - это готовый прокси для пересылки.
- Класс TFPWebProviderDataModule в модуле fpwebdata.pp обслуживает данные в формате JSON, которые могут использоваться хранилищами ExtJS.
- Класс TSQLDBRestModule в модуле sqldbrestmodule.pp реализует полноценный сервер REST, поддерживаемый SQLDB. См. дополнительную информацию в SQLDBRestBridge.
- Класс TJSONRPCModule в модуле webjsonrpc.pp реализует службу JSON-RPC.
- Класс TExtDirectModule в модуле fpextdirect.pp реализует вариант Ext.Direct службы JSON-RPC.
Hello, World!
Создадим простое веб-приложение. Как обычно преподают при изучении программирования: "Hello, World!" будет нашим первым приложением.
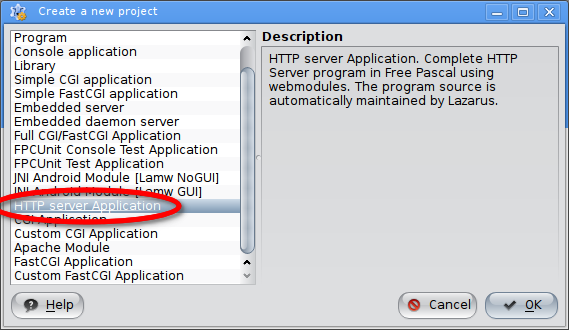
1. Откройте Lazarus и выберите Project->New Project, затем выберите HTTP server Application
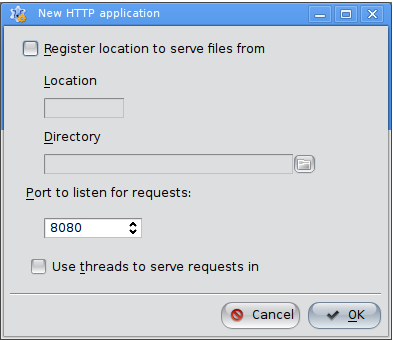
2. Появится другое диалоговое окно для обслуживания статических файлов, выбора порта и многопоточности. Просто используйте порт по умолчанию 8080.
You may skip the static files serving (go to tips and tricks section if you want to know it more).
(Вы можете пропустить обслуживание статических файлов (перейдите в раздел советов и рекомендаций, если хотите узнать больше))
- ВАЖНО!:
- Если вы решите использовать потоки на *nix, не забудьте добавить cthreads в качестве первого модуля в разделе uses .lpr, в противном случае будет создан RTE 232. При запуске с консоли должно отображаться сообщение:
This binary has no thread support compiled in. Recompile the application with a thread-driver in the program uses clause before other units using thread.
(В этом двоичном файле не скомпилирована поддержка потоков. Перекомпилируйте приложение с драйвером потока в программе using предложение перед другими модулями, использующими поток)
3. С 14 января 2017г. (или FPC 3.0.4) вам может потребоваться открыть .lpr и добавить следующую строку в основной текст, если ее еще там нет:
Application.LegacyRouting := true;
- причина будет объяснена в главе Маршрутизация.
4. Что бы вы ни выбрали, нажмите "OK", и вы будете представлены в приложении fpWeb с одним модулем по умолчанию.
5. Переместите фокус на модуль и перейдите в Object Inspector. Не стесняйтесь переименовывать модуль, если хотите.
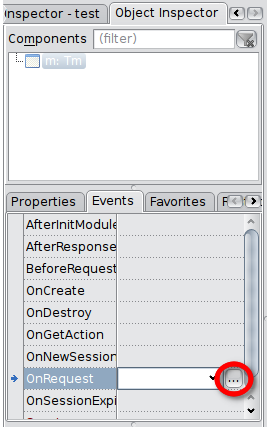
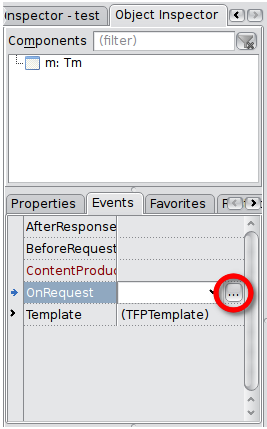
6. Выберите вкладку Events и нажмите кнопку справа от второго столбца в строкеOnRequest, чтобы создать обработчик событий.
- Вы будете перенаправлены в редактор исходного кода со следующим кодом:
procedure TFPWebModule1.DataModuleRequest(Sender: TObject; ARequest: TRequest;
AResponse: TResponse; var Handled: Boolean);
begin
  |
end;
- Заполните событие:
procedure TFPWebModule1.DataModuleRequest(Sender: TObject; ARequest: TRequest;
AResponse: TResponse; var Handled: Boolean);
begin
  AResponse.Content := 'Hello, World!';
  Handled := true;
end;
7. Теперь запустите приложение (или нажмите F9).
8. Откройте браузер и введите:
9. Вы должны увидеть отображающееся "Hello, World!".
Если это не так, проверьте ниже:
- Фреймворк выполняет много операций по обработке исключений, и отладчик IDE может их поймать и прервать работу вашего приложения. Можно добавить большинство исключений в список игнорирования, чтобы вы могли больше сосредоточиться на потоке приложения. Продолжайте пропускать и продолжайте, пока не перестанет появляться диалоговое окно и браузер не покажет результат.
- Handled := true - это способ, которым мы сообщаем фреймворку, что запрос был обработан. Если вы не установите его (или установите для него значение false), вместо этого будет отображаться страница с ошибкой. На данный момент это не влияет на поток запросов, но будет позже. Так что держите это так, пока не придет время, чтобы использовать его с пользой.
- другой трек: тест без брандмауэра, загруженного в ОЗУ (как приложение, как сервис или демон, или как оба).
Чтение данных GET и POST
Динамический контент, скорее всего, будет запускаться из пользовательского ввода, либо через формы, предоставляя значения в URL-адресе, и т. Д. Эти данные отправляются вместе с запросом, который представлен в методе как ARequest параметр типа TRequest.
Чтение GET
Данные GET предоставляются как ARequest.QueryFields, который является потомком TStrings. Короче говоря, все, что вы обычно делаете с TStrings, применимо здесь, например, доступ к данным в стиле карты через свойство Values.
Повторно используя приведенный выше код, замените тело метода на:
procedure TFPWebModule1.DataModuleRequest(Sender: TObject; ARequest: TRequest;
 AResponse: TResponse; var Handled: Boolean);
var
  LName: String;
begin
  LName := ARequest.QueryFields.Values['Name'];
  if LName = EmptyStr then
    with AResponse.Contents do
    begin
      Add('<form action="' + ARequest.URI + '" method="GET"');
      Add('<label for="name">Please tell me your name:</label>');
      Add('<input type="text" name="name" id="name" />');
      Add('<input type="submit" value="Send" />');
      Add('</form>');
    end
  else
    AResponse.Content := 'Hello, ' + LName + '!';
  Handled := true;
end;
ARequest.URI - это просто ссылка на текущий URI, поэтому даже когда вы меняете зарегистрированный модуль или имя действия, этот код остается прежним.
Обратите внимание, что, как и в Паскале, обращение к данным осуществляется без учета регистра.
Теперь вы можете попробовать запросить /, который отобразит
Please tell me your name
и /?name=<напишите здесь что угодно, например: Bob>, который отобразит
Hello, Bob!
Чтение POST
POST на самом деле не сильно отличается от GET, отличается только тем, к какому свойству получить доступ. Если доступ к GET осуществляется через ARequest.QueryFields, доступ к POST осуществляется через ARequest.ContentFields. Стиль POST предыдущего кода:
procedure TFPWebModule1.DataModuleRequest(Sender: TObject; ARequest: TRequest;
 AResponse: TResponse; var Handled: Boolean);
var
  LName: String;
begin
  LName := ARequest.ContentFields.Values['Name'];
  if LName = EmptyStr then
    with AResponse.Contents do
    begin
      Add('<form action="' + ARequest.URI + '" method="POST"');
      Add('<label for="name">Please tell me your name:</label>');
      Add('<input type="text" name="name" id="name" />');
      Add('<input type="submit" value="Send" />');
      Add('</form>');
    end
  else
    AResponse.Content := 'Hello, ' + LName + '!';
  Handled := true;
end;
Чтение загружаемых файлов
Единственное исключение - чтение полей multipart/form-data, то есть файлов. Оно доступно в ARequest.Files как экземпляр TUploadedFiles, который является потомком TCollection. Ниже приведен общедоступный интерфейс TUploadedFiles, который вы можете использовать для доступа к файлам:
TUploadedFiles = Class(TCollection)
...
public
  Function First: TUploadedFile;
  Function Last: TUploadedFile;
  Function IndexOfFile(AName: String) : Integer;
  Function FileByName(AName: String) : TUploadedFile;
  Function FindFile(AName: String) : TUploadedFile;
  Property Files[Index: Integer] : TUploadedFile read GetFile Write SetFile; default;
end;
Каждый TUploadedFile сам по себе имеет несколько свойств:
TUploadedFile = Class(TCollectionItem)
...
Public
  Destructor Destroy; override;
  Property FieldName: String Read FFieldName Write FFieldName;
  Property FileName: String Read FFileName Write FFileName;
  Property Stream: TStream Read GetStream;
  Property Size: Int64 Read FSize Write FSize;
  Property ContentType: String Read FContentType Write FContentType;
  Property Disposition: String Read FDisposition Write FDisposition;
  Property LocalFileName: String Read FLocalFileName Write FLocalFileName;
  Property Description: String Read FDescription Write FDescription;
end;
Они должны быть достаточно информативными, за исключением FileName и LocalFileName. FileName - это name исходного файла, загружаемого с клиента, LocalFileName - это путь к файлу на сервере, где файл временно хранится. Обратите внимание на разницу, выделенную жирным шрифтом выше.
Опять же, повторное использование того же обработчика запросов:
procedure TFPWebModule1.DataModuleRequest(Sender: TObject; ARequest: TRequest;
 AResponse: TResponse; var Handled: Boolean);
var
  n: Integer;
  f: TUploadedFile;
  i: Integer;
begin
  n := ARequest.Files.Count;
  if n = 0 then
    with AResponse.Contents do
    begin
      Add('<form id="form" action="' + ARequest.URI + '" method="POST" enctype="multipart/form-data">');
      Add('<label for="name">Drag n drop or click to add file:</label>');
      Add('<input type="file" name="input" />');
      Add('<input type="submit" value="Send" />');
      Add('</form>');
    end
  else
  begin
    f := ARequest.Files[0];
    AResponse.Contents.LoadFromStream(f.Stream);
  end;
  Handled := true;
end;
перетащите и бросьте файл (желательно текстовый, так как он будет отображаться как текст) в поле входного файла (или нажмите соответствующую кнопку), затем нажмите кнопку Send' (Отправить). Должно отобразиться содержимое файла.
Cookies
Отправка
Файлы cookie - небольшой фрагмент данных, отправленный веб-сервером и хранимый на компьютере пользователя. Веб-клиент (обычно веб-браузер) всякий раз при попытке открыть страницу соответствующего сайта пересылает этот фрагмент данных веб-серверу в составе HTTP-запроса (Wiki). AResponse.Cookies содержит список отправляемых файлов cookie. Это потомок TCollection, соответственно содержащийся TCookie является потомком TCollectionItem. Следовательно, вы можете использовать TCollection как способ управления элементами для управления ими.
Вот пример:
procedure TFPWebModule1.DataModuleRequest(Sender: TObject; ARequest: TRequest;
 AResponse: TResponse; var Handled: Boolean);
var
  C: TCookie;
begin
  C := AResponse.Cookies.Add;
  C.Name := 'mycookie';
  C.Value := 'somevalue';
  Handled := true;
end;
Вы не увидите никаких результатов в своем браузере. Но если вы используете какие-то инструменты разработчика (в Chrome есть встроенный) можно увидеть заголовок ответа:
Обратите внимание, что файл cookie имеет атрибуты, поэтому вы можете установить не только имя и значение. Просмотрите интерфейс TCookie, чтобы узнать, какие свойства поддерживаются.
Получение
Как только вы укажете выше заголовок Set-Cookie, последующий запрос на ваш сайт будет содержать дополнительный заголовок, содержащий значение, которое вы просили установить ранее:
К счастью, способ чтения не отличается от данных GET и POST. Связанное свойство - ARequest.CookieFields. Чтобы прочитать ранее отправленный файл cookie:
procedure TFPWebModule1.DataModuleRequest(Sender: TObject; ARequest: TRequest;
 AResponse: TResponse; var Handled: Boolean);
begin
  AResponse.Contents.Add('<p>Cookie get: ' + ARequest.CookieFields.Values['mycookie'] + '</p>');
  Handled := true;
end;
Сессии
TFPWebModule является потомком TSessionHTTPModule, поэтому имеет возможность управления сессией. Сессия основана на модулях, поэтому каждый модуль может выбирать, использовать или не использовать управление сессией.
Сессия реализована абстрактно. По умолчанию реализация не предусмотрена. Один пример реализации с использованием файлов .ini приведен в модуле iniwebsession'. Вы должны иметь этот модуль в своем проекте или реализовать его, чтобы управление сессией работало. Если вы решите реализовать один из них, в основном вам необходимо расширить и реализовать абстрактные методы в классах TCustomSession и TSessionFactory' .
Активация
Чтобы активировать управление сессией, установите для свойства CreateSession в значение true. Сессия будет запущена до обработки запроса. В случае новой сессией будет вызвано OnNewSession. Здесь инициализируйте переменные сессии.
Управление переменными сессии
Переменные сессии представлены как Session.Variables (примечание: объект сессии является эквивалентом массива $ _SESSION, используемого в Php). Это строка для сопоставления строк, подобная структуре, поэтому вы можете читать / писать так:
Session.Variables['myvar'] := myvar; // записываем
...
myvar := Session.Variables['myvar']; // читаем
Задание переменной пустой строки НЕ удаляет ее. Если вы действительно хотите удалить переменную, вместо этого вызовите Session.RemoveVariable.
Завершение
Вызывайте Session.Terminate всякий раз, когда вы хотите завершить сессию (например, выход пользователя из системы). Сессия также автоматически истечет, если следующий запрос поступит после Session.TimeOutMinutes с момента последнего запроса. Когда сессия завершается, будет вызван OnSessionExpired. Сделайте там все, что вам нужно.
Маршрутизация
Начиная с FPC 3.0.4, был реализован новый механизм маршрутизации. Вместо сохранения обратной совместимости решено, что по умолчанию будет использоваться новая маршрутизация. Таким образом, любой старый код (или новый код в зависимости от старой маршрутизации) необходимо перенести, добавив:
Application.LegacyRouting := true;
в *.lpr файле.
Старый способ
Использование нескольких модулей
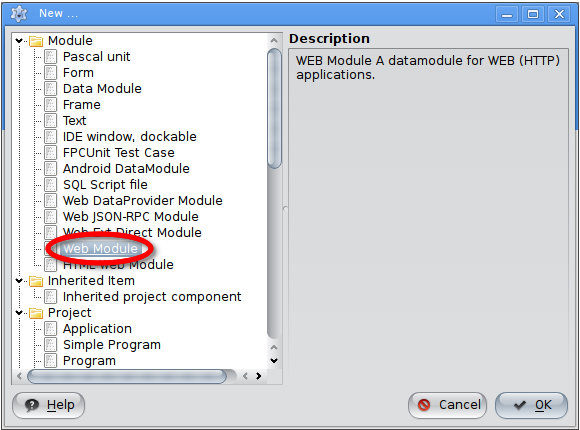
В вашем приложении может быть несколько модулей. Щелкните меню "File", затем щелкните "New...". В появившемся диалоговом окне выберите "Web Module" в дереве выбора модулей.
затем нажмите OK.
Поскольку в вашем приложении существует несколько модулей, вы больше не можете делать запрос (request) только с использованием /. Платформа не сможет волшебным образом выбрать, какой модуль должен обслуживать ответ (response), поэтому есть два способа указать, какой модуль вы хотите вызвать:
- /<module name>
- /?module=<module name>
Во втором формате вы можете изменить "module" (который является значением по умолчанию) на любой допустимый ключ строки запроса, изменив Application.ModuleVariable.
Using Actions
So far, we've only used web modules with single request handler. This doesn't scale much as your web app gets more and more complex. Moreover, some features might have shared properties and be better logically grouped, e.g.:
- Account module
- Login action
- Logout action
- Register action
- Product module
- Create action
- Update action
- Delete action
- Details action
Request Handling Flow
Before using action, it is important to know fpWeb request handling flow. Failing to do so might render your action useless because it's always your data module that handles the request. How could that be? Going back a few chapters, remember the Handled := true that we always did before? Now this is where Handled parameter comes into play.
Every requests will go through module's OnRequest first, regardless the requested action. Only if it does not set Handled to true, web action's OnRequest is executed.
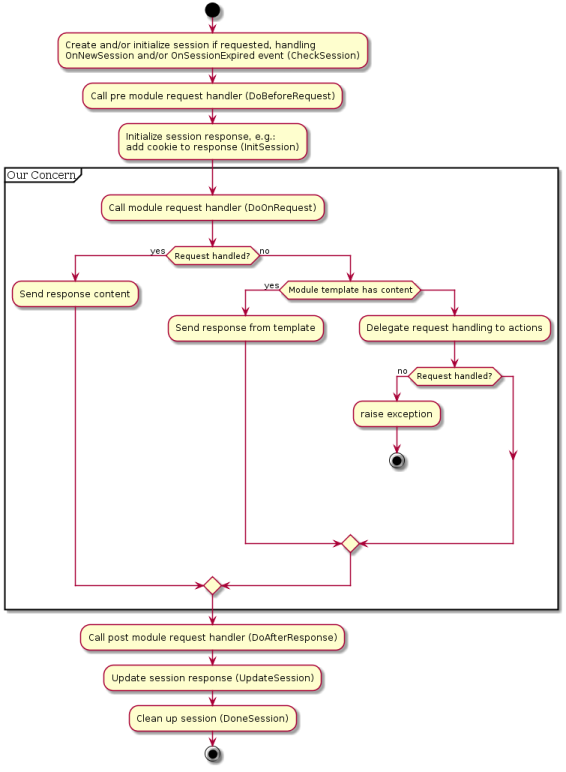
In general, the request flow is:
Notice the "Our Concern" box, that's what we're going to put our attention at.
Add Actions to Web Modules
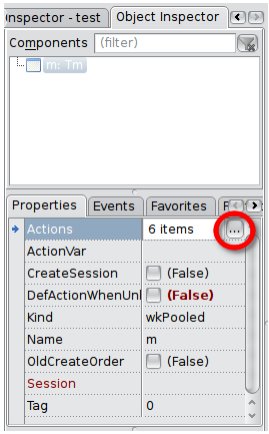
To add an action, select the web module then go to object inspector. In the properties tab, select Actions and click the button on the second column.
A popup window shall appear where you can add, delete and reorder actions.
Press Add, a new action shall appear in the list. Select it then go to object inspector. It will currently show properties and events of that newly created action. Rename the Name property (this will be the name you write in the URL, so give it a short, simple but descriptive name) as you wish, I will choose "Hello". Move on to events tab, do the same as OnRequest for module, click button on the right of OnRequest row to create the request handler.
You will be presented in the same OnRequest interface, but this one handles web action instead of web module. Whatever you can do in web module's OnRequest can be done here as well. Copy the method body from the "Hello, World!" section.
Remember to remove Handled := true from the previous web module's OnRequest body (or remove the event completely) for the action to take care of the request handling.
Run your project, and fire up your browser. Now, since the request handling is delegated to web action, you can no longer just request /, but you need /<action name> or <Module's ActionVar property>=<action name>. Note that <Module's ActionVar property> has a default value of empty string, unlike Application.ModuleVariable which has "module" as the default value. So, by default, you can only use the /<action name> form.
If you have multiple modules, then you have a variety of options:
- /<module name>/<action name>
- /<module name>?action=<action name>
- /<action name>?module=<module name>
- /?module=<module name>&action=<action name>
Note that as soon as a module have at least one action, /<module or action name> alone will by default map to /<action name>. To change the behavior such that it maps to /<module name> by default, set Application.PreferModuleName to true. In case of multiple modules, if no module name given, then the default module will handle the given action. To change the behavior such that module name must be explicitly given, set Application.AllowDefaultModule to false.
The following tables summarize what will happen based on the two properties:
| /<module or action name> | Application.PreferModuleName | ||
|---|---|---|---|
| true | false | ||
| Application.AllowDefaultModule | true | /<module name> | /<default module>/<action name> |
| false | /<module name> | ERROR | |
Default Action
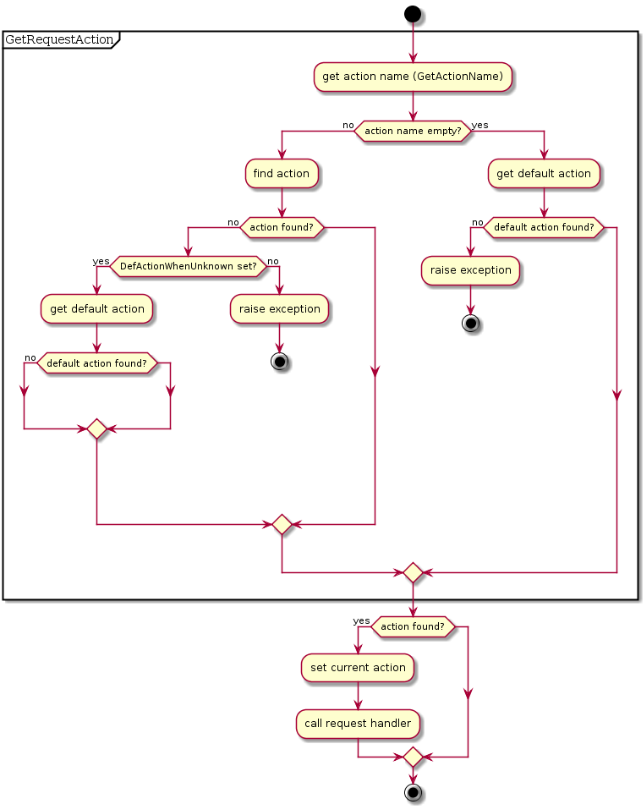
Remember the previous diagram, the "Delegate request handling to actions" is actually not so simple, but if we expand that diagram, the image will be too big to fit. So, here's the diagram of that part:
Two important things from the flow: DefActionWhenUnknown and a default action. The former is a web module's property while the latter corresponds to Default property of an action. In the latter case, in case there are more than two actions having Default property set to true, the the action order (as how it's shown in the manage actions popup window) will be considered to decide which is the default action. The two properties forms what the application should do if no matching action found for a given request.
The following tables summarize what will happen based on the two properties:
| Request with invalid action name | DefActionWhenUnknown | ||
|---|---|---|---|
| true | false | ||
| Action.Default | true | Request handled by default action | Error: No action found for action: <action name> |
| false | Error: Invalid action name and no default action | Error: No action found for action: <action name> | |
| Request without action name, i.e.: / | DefActionWhenUnknown | ||
|---|---|---|---|
| true | false | ||
| Action.Default | true | Request handled by default action | Request handled by default action |
| false | Error: No action name and no default action | Error: No action name and no default action | |
In case of error response above, a stack trace shall follow, complete with line number information if you build your app with -gl. We'll see later on how to create custom handler for this (stacktrace are no good for production). But for now, make sure you understand the concept of web module and web action, especially the request flow. Play around until you think you're ready for next section.
New Mechanism
The new mechanism is extremely flexible and works even without data modules (old mechanism only works with data modules).
A dedicated unit for this routing is provided as httproute (add this to uses clause of program / unit where you want to register routes). The unit contains a function HTTPRouter that will return singleton object responsible for application's route management and has RegisterRoute method to register your route.
Route Syntax
The first parameter of HTTPRouter.RegisterRoute is the route that will be matched against incoming request. It can be as simple as * above, which means 0 or more paths or simply any paths, up to as complex as /api/v1/:resource/* which means REQUEST_URI header should start with /api/v1/ followed by something else that will be bound to variable named resource and finally ended with 0 or more paths. It will match:
- /api/v1/products
- /api/v1/products/1
- /api/v1/products/1/clone
- /api/v1/products/something/else/that/is/really/long/and/silly
but not:
- /api/v1
- /excuse/me/api/v1/products
Basically there are only 3 special characters:
- * denoting 0 or more paths
- :param denoting a part
- / denoting part separator
your route will be composed of these 3 characters, plus everything else that made up a route.
Registering a Route
The 2nd, 3rd or 4th parameter (depending on whether you want to handle specific HTTP method and/or pass additional data to it) of HTTPRouter.RegisterRoute is overloaded with several possibilities:
- Callback procedure
TRouteCallback = Procedure(ARequest: TRequest; AResponse);
- Callback event
TRouteEvent = Procedure(ARequest: TRequest; AResponse) of object;
- Object satisfying a (CORBA) interface
IRouteInterface = Interface ['{10115353-10BA-4B00-FDA5-80B69AC4CAD0}']
  Procedure HandleRequest(ARequest: TRequest; AResponse: TResponse);
end;
- Object extending abstract router class
TRouteObject = Class(TObject, IRouteInterface)
Public
  Procedure HandleRequest(ARequest: TRequest; AResponse: TResponse); virtual; abstract;
end;

TRouteObjectClass = Class of TRouteObject;
By default, if 2nd parameter is not a TRouteMethod, then all HTTP methods will match. Use one of rmUnknown, rmAll, rmGet, rmPost, rmPut, rmDelete, rmOptions, rmHead, rmTrace to match only a specific HTTP method.
Registration order matters. If there are two or more routes matching the current request, the earlier registered one will handle it.
In this new mechanism, standalone Hello, World! program can be as simple as:
uses
  fphttpapp, httpdefs, httproute;
procedure DoHello(ARequest:TRequest; AResponse : TResponse);
begin
  AResponse.Content:='<html><body><h1>Hello,World!</h1></body></html>'
end;

begin
  HTTPRouter.RegisterRoute('*', @DoHello);
  Application.Port := 9000;
  Application.Initialize;
  Application.Run;
end.
Webserver example
This is an example of a simple, cross-platform, multi-threaded web server.
program webserver;

{$mode objfpc}{$H+}

uses
  {$ifdef UNIX}
    cthreads, cmem,
  {$endif}
  fphttpapp, httpdefs, httproute;

procedure route1(aReq: TRequest; aResp: TResponse);
begin
  aResp.content:='<html><body><h1>Route 1 The Default</h1></body></html>'
end;

procedure route2(aReq: TRequest; aResp: TResponse);
begin
  aResp.content:='<html><body><h1>Route 2</h1></body></html>'
end;

begin
  HTTPRouter.registerRoute('/', @route1, true);
  HTTPRouter.registerRoute('/route2', @route2);
  Application.port := 8080;
  Application.threaded := true;
  Application.initialize;
  Application.run;
end.
Using Templates
fpWeb has integrated support for FPTemplate, Free Pascal's generic templating engine. It doesn't have to be used from web application context, but with integrated support things will be easier a bit. At least the memory management can be ignored as the module will take care of it.
There are two levels where one can use templates at: action and module. The full RAD support is incomplete, so you need to go down to hand coding at some points.
There are two modes of operation: non-parameterized and parameterized. The active mode is controlled by AllowTagParams property, which should be obvious enough what value refers to what mode.
Template string can be given from a file through FileName property or a direct string through Template property. Template.Template, I know it sounds weird :) If both are filled then FileName will take precedence.
The two properties: StartDelimiter and EndDelimiter define how the engine should recognize a template tag. For instance, if you have:
- StartDelimiter = '{+'
- EndDelimiter = '+}'
then a string '{+title+}' defines a template tag named 'title'. Note that spaces are significant, so '{+ title +}' defines a template tag named ' title ' instead of just 'title'.
Special for parameterized mode, additional three properties: ParamStartDelimiter, ParamEndDelimiter and ParamValueSeparator defines how the engine should recognize a template tag parameter. For instance, if you have:
- ParamStartDelimiter = '[-'
- ParamEndDelimiter = '-]'
- ParamValueSeparator = '='
then a string '{+data [-p=v-][-a=b-] +}' defines a template tag named 'data' with parameter 'p' of value 'v' and parameter 'a' of value 'b'. This can be used to pass template level parameter such as expected date format, header-row-footer for customizable output presentation, name of file, etc. you decide.
As a consequence of different way of operation, the core event where the template works is different, too. Non-parameterized will use OnGetParam while the parameterized will use OnReplaceTag. The two has of course different interface:
Type
  // OnGetParam: for simple template tag support only (ex: {Name})
  TGetParamEvent = Procedure(
    Sender: TObject;
    Const ParamName: String;
    Out AValue: String
  ) Of Object;
  // OnReplaceTag: for tags with parameters support
  TReplaceTagEvent = Procedure(
    Sender: TObject;
    Const TagString: String;
    TagParams: TStringList;
    Out ReplaceText: String
  ) Of Object;
In OnGetParam, you check for ParamName, then assign AValue accordingly. i.e., if you want tag 'title' to be replaced by 'My App', then fill in the method with:
// use Trim() if you want the spaces around tag to be insignificant
case Trim(ParamName) of
  'title': AValue := 'My App';
else
  AValue := 'UNKNOWN';
end;
In OnReplaceTag, you check for TagString and optionally TagParams, then assign ReplaceText accordingly. i.e., if you want tag 'datetime' to be replaced by current time with parameter 'datetimeformat' to specify how the date and time should be formatted, then fill in the method like this:
// use Trim() if you want the spaces around tag to be insignificant
case Trim(TagString) of
  'datetime': AValue := FormatDateTime(TagParams.Values['datetimeformat'],Now);
else
  AValue := 'UNKNOWN';
end;
At Action Level
Create/select an action, then go to object inspector. You will see a subcomponent property named Template. This template is a normal TFPTemplate instance. Expand it and fill in the properties as explained above. Now go to Events tab, again expand Template, you will see the two events. Fill the one based on your value of AllowTagParams property.
NOTE: If your Lazarus cannot autocomplete the event, try writing the name manually in the edit box then click the ... button. This is a bug in present Lazarus which may be fixed in the future.
At this level, template with a content is not automatically set as request handler. It might change in the future, but let's deal with its current state. Fill in OnRequest event of the action, then fill it with:
with Actions.CurrentAction as TFPWebAction do
begin
  AResponse.Content := Template.GetContent;
end;
Handled := true;
The cast is required since CurrentAction is of type TCustomWebAction instead of TFPWebAction. Without it, we can't access the Template property.
At Module Level
At module level, you currently have to do it by hand coding since no RAD support is implemented. The linked property is ModuleTemplate . This is however not a regular TFPTemplate instance, but special TFPWebTemplate class that's a descendant of it.
The idea here is to have module provide a layout while the actions provide content, with the ability to provide additional variables. It's therefore a good idea to keep AllowTagParams as is and assign OnGetParam event **of the module** only. Do NOT assign OnGetParam of ModuleTemplate as it will never be called.
A template tag named 'content' will be replaced automatically by what content produced by action, everything else is either replaced from internal template variables or from OnGetParam.
Using Separated Template
Despite the somewhat incomplete integration, nothing stops you from using fpTemplate (or any other templating solutions) manually, outside from the integrated support. This could even be better in some cases since it's modular.
Using an html Producer object
Assuming that there is a TWebAction named act_get_my_html, you must ask to write in AResponse, the return of an internal bytes stream: when answering with html Producer objects solution, we must use the methods of the writer. It manages a memory stream for a purpose of rapidity. No string type here, like with the above fpTemplate solution which uses text \ string processing as in the regular Php way. The Producer writes in AResponse with a recursive " foreach " iteration, that traverses the polymorphic objects HTML Dom tree, composed with the hierarchy THtmlCustomElement = Class(TDOMElement) Classes (see unit htmlelements.pp). So, the AResponse is written by the parameter aWriter, with the following call:
procedure TFPWebModule1.act_get_my_htmlRequest(Sender: TObject; ARequest: TRequest; AResponse: TResponse; var Handled: Boolean);
begin
  (* ask HTMLEntityProducer1 for the content of its html DOM elements: *)
  HTMLEntityProducer1.HandleRequest(ARequest, AResponse, Handled);
  Handled := True;
end;
Said again, it's the job of the Producer to convert its internal memory stream into text in the response object: that's how this pattern was designed, although there is a text-html rendering method named ProduceContent for debugging purposes only. You can override this method if you are writing or debugging a Producer component.
Here is an example, always with an html Producer object, allowing to create a web application in the "RAD way", i.e. with the drag-drop of the HTMLEntityProducer component from the pallet:
procedure TFPWebModule1.HTMLEntityProducer1WriteEntity(Sender: THTMLContentProducer; aWriter: THTMLWriter);
begin

  aWriter.startHeader;
    aWriter.Meta('','Content-Type','text/html; charset=UTF-8');
    aWriter.title('My web page');
    aWriter.link('stylesheet','stylesheet.css','text/css','screen');
  aWriter.EndHeader;

  aWriter.Startbody;
    aWriter.Startparagraph;
      aWriter.heading2('Hello, world from inside §1:');
      aWriter.Text('Here is text written inside the current paragraph.');
    aWriter.Endparagraph;
    aWriter.paragraph('This is another text written inside a self "started and ended" paragraph.');
    aWriter.Startparagraph;
      aWriter.heading2('Hello, world from inside §2:');
      aWriter.Text('Here is the final text.');
      aWriter.Image.src := 'logo.png';
      AnotherProducer.WriteContent(aWriter);
    aWriter.Endparagraph;
  aWriter.Endbody;

end;
The TWebAction.ContentProducer property allows to couple a THTTPContentProducer to its web action exposed via a URI on the net.
[ToDo: there is no official documentation about the components "RAD way" of fpWeb (html producer, html provider, html adapter, html formatter, etc)]
Tips and Tricks
Returning Different HTTP Response Code
By default, fpWeb will return HTTP 200 OK to indicate successful request handling. This surely is not always the case, as user input might not be as what we expected. To do so, set AResponse.Code in your request handler to the code you want to return.
Redirect Request to Different URL
A common flow after a successful login is to redirect user to his account page. This can be done by calling AResponse.SendRedirect in your request handler, supplying the URL to redirect request to.
Serving Static Files (Embedded Web Server)
Remember the dialog in the #Hello, World! section after you select HTTP server Application? If you tick "Register location to serve files from" you can fill "Location" (the URI segment, must not contain any slashes) and "Directory" (physical directory in your computer, must exist at runtime) and the wizard will simply add:
RegisterFileLocation('<Location>','<Directory>');
to the beginning of your .lpr and add the unit fpwebfile to the uses clause. You can actually do this by hand anytime and also register multiple times for different locations / directories. After this you can request /<Location>/<any filename under Directory> and it will be served automatically. Note that the mimetype of the file is determined by fpmimetypes. Call MimeTypes.LoadFromFile with your mime.types file in order to give correct mimetype based on its extension. Otherwise, the file will always be served as application/octet-stream which means the browser will download it instead of interpreting it (especially important for JavaScript and CSS files).
You can grab a complete mime.types here http://svn.apache.org/viewvc/httpd/httpd/trunk/docs/conf/mime.types?&view=co
In Lazarus 2.0.6 or newer you must add at the top of your program the full path of the mime.types file
begin
  MimeTypesFile := Application.Location + 'mime.txt';
Take into consideration that the default path coming with the project is lib\$(TargetCPU)-$(TargetOS)
For example httpproject\lib\i386-win32\mime.txt
Centralize Management of Configuration and Modules
By default, the program file (.lpr) is the one that contains protocol unit. This limits the ability to use Application object from other contexts such as from web modules. Fortunately, it's not difficult to refactor to have what we want. We remove RegisterHTTPModule calls from web modules' units and left out the .lpr to empty main block with single unit identifier in the uses clause, we name it: brokers. The unit contains:
unit Brokers;

{$mode objfpc}{$H+}

interface

{ $define cgi}
{ $define fcgi}
{$define httpapp}

uses
  CustWeb;

function GetApp: TCustomWebApplication; inline;

implementation

uses
  {$ifdef cgi}fpcgi{$endif}
  {$ifdef fcgi}fpfcgi{$endif}
  {$ifdef httpapp}fphttpapp{$endif}
  ,webmodule1
  ,webmodule2
  ;

function GetApp: TCustomWebApplication;
begin
  Result := Application;
end;

initialization
  RegisterHTTPModule('wm1', TWebModule1);
  RegisterHTTPModule('wm2', TWebModule2);
  {$ifndef cgi}
  Application.Port := 2015;
  {$endif}
  Application.Initialize;
  Application.Run;
end.
This way, we can control over web module registration and also provide an API to get Application object (casted as TCustomWebApplication), while still easily switch between protocol implementations, in a single place.
Terminating Gracefully (FastCGI / Embedded Web Server)
Instead of Ctrl+C-ing your app, there is a way for your app to terminate gracefully, doing whatever cleanup it needs, by calling Application.Terminate. You might need to use previous trick to easily access the Application object. A common implementation is to provide a specific password protected module / action that calls the Terminate method. You may choose whatever way you want, though.
Custom Exception Handler
[edit the May 1, 2020 => moved from a method pointer to a simple procedure.]
To override the default exception handler, which prints stacktrace whenever an exception is raised (i.e.: on HTTP 404 or 500), and thus not good for production, you must assign Application.OnShowRequestException.
This is a method so you will need to provide your procedure that implements the method and assign it by using the object. i.e.: if you have MyExceptionHandler as an
object of TMyExceptionHandler which has MyShowRequestException method, you can assign it by:
Application.OnShowRequestException := @MyExceptionHandler.MyShowRequestException;
don't forget to .Create() MyExceptionHandler BEFORE assigning above or you will get an
EAccessViolation!
You must provide your global procedure that implements your own exception handler (in production, it is advisable to replace the call stack by an HTTP status code and its explanation). Then, you can override the default exception handler, by assigning it like this:
Application.OnShowRequestException := @MyShowRequestException;
Pure Hand Coding (No Form Designer Required)
It's not a must to use Lazarus' form designer to write an fpWeb application. You can use pure hand coding technique to write it. The secret lies in the 3rd parameter of RegisterHTTPModule : SkipStreaming. When this parameter is set to true, fpWeb will not search for .lfm resource. Therefore everything must be manually handled: property settings, event handlers, action registration, etc.
Note that it's logical to do what's usually done through object inspector in an overriden constructor. Inside it, call the inherited constructor supplying both AOwner and CreateMode as parameters. After that you can set properties, assign event handlers, etc. Example:
type
  THelloWorldModule = class(TFPWebModule)
    constructor CreateNew(AOwner: TComponent; CreateMode: Integer); override;
    procedure Request(Sender: TObject; ARequest: TRequest;
      AResponse: TResponse; var Handled: Boolean);
  end;

constructor THelloWorldModule.CreateNew(AOwner: TComponent; CreateMode: Integer);
begin
  inherited CreateNew(AOwner,CreateMode);
  OnRequest := @Request;
end;

procedure THelloWorldModule.Request(Sender: TObject; ARequest: TRequest;
 AResponse: TResponse; var Handled: Boolean);
begin
  AResponse.Content := 'Hello, World!';
  Handled := true;
end;
See also
- Lazarus for the web (tutorial)
- Lazarus for the web: Sessions and Templates (tutorial) This article explains a TSQLDBSession Class that manages a SQL connection, that inherits from a web session (in order to manage the histories of web session variables, within a connection-session to a database having row-locking capabilities).
- the examples - read the text files - in your directory ...\fpc\x.x.x\source\packages\fcl-web\examples.
- XML or JSON, on ExtJS: if you want to use a more or less complex engine that is very "accomplished" regarding the rendering aspect of Javascript objects on the browser side, in addition to their functionalities (like ExtJS, for example, to display a db-aware grid, dynamic graphics, etc), this kind of solution very very often expects an XML or a JSON file. There are Adapter and Formatter classes (e.g. the classes TExtJSXMLWebdataInputAdaptor, TExtJSJSONDataFormatter).
Overall, the Adapter classes adapt the nodes of an incoming jSon or XML to a mapping of their TField database fields. And Formatter classes are mappers of each TField of a record to its node in jSon or XML format, before sending it out towards the browser.


