Difference between revisions of "BGRABitmap tutorial 5"
m (→About masks) |
m (Fixed syntax highlighting) |
||
| Line 17: | Line 17: | ||
In this example, the image, the start image is in the upper-left corner, the mask in the upper-right one, and the result when applying the mask in the lower-left corner. | In this example, the image, the start image is in the upper-left corner, the mask in the upper-right one, and the result when applying the mask in the lower-left corner. | ||
| − | Code in OnPaint : | + | Code in OnPaint: |
| − | <syntaxhighlight>var temp,tex,mask: TBGRABitmap; | + | |
| + | <syntaxhighlight lang="pascal"> | ||
| + | var temp,tex,mask: TBGRABitmap; | ||
begin | begin | ||
temp:= TBGRABitmap.Create(640,480,ColorToBGRA(ColorToRGB(clBtnFace))); | temp:= TBGRABitmap.Create(640,480,ColorToBGRA(ColorToRGB(clBtnFace))); | ||
| Line 49: | Line 51: | ||
temp.Draw(Canvas,0,0,True); | temp.Draw(Canvas,0,0,True); | ||
temp.Free; | temp.Free; | ||
| − | end;</syntaxhighlight> | + | end; |
| + | </syntaxhighlight> | ||
=== Erasing parts of an image === | === Erasing parts of an image === | ||
| Line 59: | Line 62: | ||
Here an ellipse is erased on the left with an alpha parameter of 255, and another ellipse is erased on the right with an alpha parameter of 128. | Here an ellipse is erased on the left with an alpha parameter of 255, and another ellipse is erased on the right with an alpha parameter of 128. | ||
| − | Code in OnPaint : | + | Code in OnPaint: |
| − | <syntaxhighlight> | + | |
| + | <syntaxhighlight lang="pascal"> | ||
var image,tex: TBGRABitmap; | var image,tex: TBGRABitmap; | ||
begin | begin | ||
| Line 84: | Line 88: | ||
image.Draw(Canvas,0,0,True); | image.Draw(Canvas,0,0,True); | ||
image.Free; | image.Free; | ||
| − | end;</syntaxhighlight> | + | end; |
| + | </syntaxhighlight> | ||
=== Add a painting handler === | === Add a painting handler === | ||
| − | With the object inspector, add an OnPaint handler and write : | + | With the object inspector, add an OnPaint handler and write: |
| − | <syntaxhighlight>procedure TForm1.FormPaint(Sender: TObject); | + | |
| + | <syntaxhighlight lang="pascal"> | ||
| + | procedure TForm1.FormPaint(Sender: TObject); | ||
var image: TBGRABitmap; | var image: TBGRABitmap; | ||
size: single; | size: single; | ||
| Line 121: | Line 128: | ||
image.Draw(Canvas,0,0,True); | image.Draw(Canvas,0,0,True); | ||
image.free; | image.free; | ||
| − | end; </syntaxhighlight> | + | end; |
| + | </syntaxhighlight> | ||
The procedure creates an image and fills it with a blue gradient. This is the background layer. | The procedure creates an image and fills it with a blue gradient. This is the background layer. | ||
| Line 135: | Line 143: | ||
=== Add another layer with a sun === | === Add another layer with a sun === | ||
| − | In the OnPaint event, add the following subprocedure : | + | In the OnPaint event, add the following subprocedure: |
| − | <syntaxhighlight> | + | |
| + | <syntaxhighlight lang="pascal"> | ||
| + | procedure DrawSun; | ||
var layer,mask: TBGRABitmap; | var layer,mask: TBGRABitmap; | ||
begin | begin | ||
| Line 150: | Line 160: | ||
image.PutImage(0,0,layer,dmDrawWithTransparency); | image.PutImage(0,0,layer,dmDrawWithTransparency); | ||
layer.Free; | layer.Free; | ||
| − | end; </syntaxhighlight> | + | end; |
| + | </syntaxhighlight> | ||
This procedures creates a radial gradient of red and orange and applies a circular mask to it. This results in a colored disk. Finally, the layer is merged with the background. | This procedures creates a radial gradient of red and orange and applies a circular mask to it. This results in a colored disk. Finally, the layer is merged with the background. | ||
| Line 164: | Line 175: | ||
=== Add a light layer === | === Add a light layer === | ||
| − | Add the following subprocedure in the OnPaint event : | + | Add the following subprocedure in the OnPaint event: |
| − | <syntaxhighlight> | + | |
| + | <syntaxhighlight lang="pascal"> | ||
| + | procedure ApplyLight; | ||
var layer: TBGRABitmap; | var layer: TBGRABitmap; | ||
begin | begin | ||
| Line 175: | Line 188: | ||
image.BlendImage(0,0,layer,boMultiply); | image.BlendImage(0,0,layer,boMultiply); | ||
layer.Free; | layer.Free; | ||
| − | end;</syntaxhighlight> | + | end; |
| + | </syntaxhighlight> | ||
This procedure draws a layer with a white radial gradient. It is then applied to multiply the image. | This procedure draws a layer with a white radial gradient. It is then applied to multiply the image. | ||
| Line 181: | Line 195: | ||
=== Resulting code === | === Resulting code === | ||
| − | <syntaxhighlight>procedure TForm1.FormPaint(Sender: TObject); | + | <syntaxhighlight lang="pascal"> |
| + | procedure TForm1.FormPaint(Sender: TObject); | ||
var image: TBGRABitmap; | var image: TBGRABitmap; | ||
size: single; | size: single; | ||
| Line 242: | Line 257: | ||
image.Draw(Canvas,0,0,True); | image.Draw(Canvas,0,0,True); | ||
image.free; | image.free; | ||
| − | end;</syntaxhighlight> | + | end; |
| + | </syntaxhighlight> | ||
=== Run the program === | === Run the program === | ||
Revision as of 01:50, 2 January 2020
│ Deutsch (de) │ English (en) │ español (es) │ français (fr) │
Home | Tutorial 1 | Tutorial 2 | Tutorial 3 | Tutorial 4 | Tutorial 5 | Tutorial 6 | Tutorial 7 | Tutorial 8 | Tutorial 9 | Tutorial 10 | Tutorial 11 | Tutorial 12 | Tutorial 13 | Tutorial 14 | Tutorial 15 | Tutorial 16 | Edit
This tutorial shows you how to use layers.
Create a new project
Create a new project and add a reference to BGRABitmap, the same way as in the first tutorial.
About masks
A mask is a grayscale image. When a mask is applied on an image, the parts of the image that overlap with black parts of the mask are erased and become transparent, whereas parts that overlap with white parts of the mask are kept. In other words, the mask is like an alpha channel the defines opacity. If the mask value is zero, then it becomes transparent, and if a mask value is 255, it becomes opaque.
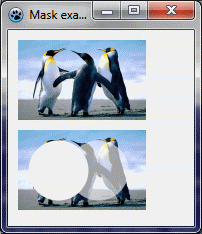
In this example, the image, the start image is in the upper-left corner, the mask in the upper-right one, and the result when applying the mask in the lower-left corner.
Code in OnPaint:
var temp,tex,mask: TBGRABitmap;
begin
  temp:= TBGRABitmap.Create(640,480,ColorToBGRA(ColorToRGB(clBtnFace)));

  //loading and scaling texture
  tex := TBGRABitmap.Create('texture.png');
  BGRAReplace(tex,tex.Resample(128,80));

  //show image in the upper-left corner
  temp.PutImage(10,10,tex,dmDrawWithTransparency);

  //create a mask with ellipse and rectangle
  mask := TBGRABitmap.Create(128,80,BGRABlack);
  mask.FillEllipseAntialias(40,40,30,30,BGRAWhite);
  mask.FillRectAntialias(60,40,100,70,BGRAWhite);

  //show mask in the upper-right corner
  temp.PutImage(150,10,mask,dmDrawWithTransparency);

  //apply the mask to the image
  tex.ApplyMask(mask);

  //show the result image in the lower-left corner
  temp.PutImage(10,100,tex,dmDrawWithTransparency);

  mask.Free;
  tex.Free;

  //show everything on the screen
  temp.Draw(Canvas,0,0,True);
  temp.Free;
end;
Erasing parts of an image
Some functions allow to erase an ellipse, a rectangle etc. It means that the part of the image becomes transparent. It is thus possible to draw a hole in an image. If the alpha parameter is 255, the hole is completely transparent. If not, the hole is half-transparent.
Here an ellipse is erased on the left with an alpha parameter of 255, and another ellipse is erased on the right with an alpha parameter of 128.
Code in OnPaint:
var image,tex: TBGRABitmap;
begin
  image := TBGRABitmap.Create(640,480,ColorToBGRA(ColorToRGB(clBtnFace)));

  //load and scale texture
  tex := TBGRABitmap.Create('texture.png');
  BGRAReplace(tex,tex.Resample(128,80));

  //show image
  image.PutImage(10,10,tex,dmDrawWithTransparency);

  //erase parts
  tex.EraseEllipseAntialias(40,40,30,30,255);
  tex.EraseEllipseAntialias(80,40,30,30,128);

  //show result
  image.PutImage(10,100,tex,dmDrawWithTransparency);

  tex.Free;

  //show everything on the screen
  image.Draw(Canvas,0,0,True);
  image.Free;
end;
Add a painting handler
With the object inspector, add an OnPaint handler and write:
procedure TForm1.FormPaint(Sender: TObject);
var image: TBGRABitmap;
    size: single;

  procedure DrawMoon;
  var layer: TBGRABitmap;
  begin
    layer := TBGRABitmap.Create(image.Width,image.Height);
    layer.FillEllipseAntialias(layer.Width/2,layer.Height/2,size*0.4,size*0.4,BGRA(224,224,224,128));
    layer.EraseEllipseAntialias(layer.Width/2+size*0.15,layer.Height/2,size*0.3,size*0.3,255);
    image.PutImage(0,0,layer,dmDrawWithTransparency);
    layer.Free;
  end;

begin
  image := TBGRABitmap.Create(ClientWidth,ClientHeight);

  //Compute available space in both directions
  if image.Height < image.Width then
    size := image.Height
  else
    size := image.Width;

  image.GradientFill(0,0,image.Width,image.Height,
                     BGRA(128,192,255),BGRA(0,0,255),
                     gtLinear,PointF(0,0),PointF(0,image.Height),
                     dmSet);

  DrawMoon;

  image.Draw(Canvas,0,0,True);
  image.free;
end;
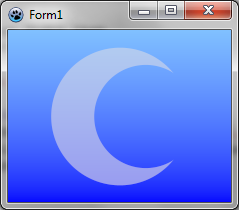
The procedure creates an image and fills it with a blue gradient. This is the background layer.
The procedure DrawMoon creates a layer, draws a moon in it. First a white disk is drawn, then a smaller disk is subtracted. Finally, this layer is merged with the background.
Run the program
You should see a blue sky with a moon. When you resize the form, the image is resized accordingly.
Add another layer with a sun
In the OnPaint event, add the following subprocedure:
  procedure DrawSun;
  var layer,mask: TBGRABitmap;
  begin
    layer := TBGRABitmap.Create(image.Width,image.Height);
    layer.GradientFill(0,0,layer.Width,layer.Height,
                       BGRA(255,255,0),BGRA(255,0,0),
                       gtRadial,PointF(layer.Width/2,layer.Height/2-size*0.15),PointF(layer.Width/2+size*0.45,layer.Height/2-size*0.15),
                       dmSet);
    mask := TBGRABitmap.Create(layer.Width,layer.Height,BGRABlack);
    mask.FillEllipseAntialias(layer.Width/2+size*0.15,layer.Height/2,size*0.25,size*0.25,BGRAWhite);
    layer.ApplyMask(mask);
    mask.Free;
    image.PutImage(0,0,layer,dmDrawWithTransparency);
    layer.Free;
  end;
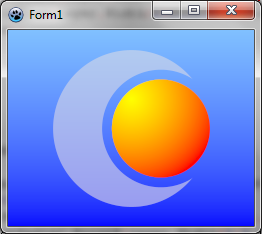
This procedures creates a radial gradient of red and orange and applies a circular mask to it. This results in a colored disk. Finally, the layer is merged with the background.
Add a call to this procedure to draw it after the moon.
Run the program
You should see a blue sky with a moon and a sun. When you resize the form, the image is resized accordingly.
Add a light layer
Add the following subprocedure in the OnPaint event:
  procedure ApplyLight;
  var layer: TBGRABitmap;
  begin
    layer := TBGRABitmap.Create(image.Width,image.Height);
    layer.GradientFill(0,0,layer.Width,layer.Height,
                       BGRA(255,255,255),BGRA(64,64,64),
                       gtRadial,PointF(layer.Width*5/6,layer.Height/2),PointF(layer.Width*1/3,layer.Height/4),
                       dmSet);
    image.BlendImage(0,0,layer,boMultiply);
    layer.Free;
  end;
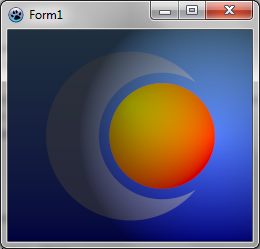
This procedure draws a layer with a white radial gradient. It is then applied to multiply the image.
Resulting code
procedure TForm1.FormPaint(Sender: TObject);
var image: TBGRABitmap;
    size: single;

  procedure DrawMoon;
  var layer: TBGRABitmap;
  begin
    layer := TBGRABitmap.Create(image.Width,image.Height);
    layer.FillEllipseAntialias(layer.Width/2,layer.Height/2,size*0.4,size*0.4,BGRA(224,224,224,128));
    layer.EraseEllipseAntialias(layer.Width/2+size*0.15,layer.Height/2,size*0.3,size*0.3,255);
    image.PutImage(0,0,layer,dmDrawWithTransparency);
    layer.Free;
  end;

  procedure DrawSun;
  var layer,mask: TBGRABitmap;
  begin
    layer := TBGRABitmap.Create(image.Width,image.Height);
    layer.GradientFill(0,0,layer.Width,layer.Height,
                       BGRA(255,255,0),BGRA(255,0,0),
                       gtRadial,PointF(layer.Width/2,layer.Height/2-size*0.15),PointF(layer.Width/2+size*0.45,layer.Height/2-size*0.15),
                       dmSet);
    mask := TBGRABitmap.Create(layer.Width,layer.Height,BGRABlack);
    mask.FillEllipseAntialias(layer.Width/2+size*0.15,layer.Height/2,size*0.25,size*0.25,BGRAWhite);
    layer.ApplyMask(mask);
    mask.Free;
    image.PutImage(0,0,layer,dmDrawWithTransparency);
    layer.Free;
  end;

  procedure ApplyLight;
  var layer: TBGRABitmap;
  begin
    layer := TBGRABitmap.Create(image.Width,image.Height);
    layer.GradientFill(0,0,layer.Width,layer.Height,
                       BGRA(255,255,255),BGRA(64,64,64),
                       gtRadial,PointF(layer.Width*5/6,layer.Height/2),PointF(layer.Width*1/3,layer.Height/4),
                       dmSet);
    image.BlendImage(0,0,layer,boMultiply);
    layer.Free;
  end;

begin
  image := TBGRABitmap.Create(ClientWidth,ClientHeight);

  if image.Height < image.Width then
    size := image.Height
  else
    size := image.Width;

  image.GradientFill(0,0,image.Width,image.Height,
                     BGRA(128,192,255),BGRA(0,0,255),
                     gtLinear,PointF(0,0),PointF(0,image.Height),
                     dmSet);

  DrawMoon;
  DrawSun;
  ApplyLight;

  image.Draw(Canvas,0,0,True);
  image.free;
end;
Run the program
You should see a blue sky with a moon and a sun, with a light effect. When you resize the form, the image is resized accordingly.
Previous tutorial (direct pixel access) Next tutorial (line style)


