Turbopower Visual PlanIt/ru
│
English (en) │
português (pt) │
русский (ru) │
О компоненте
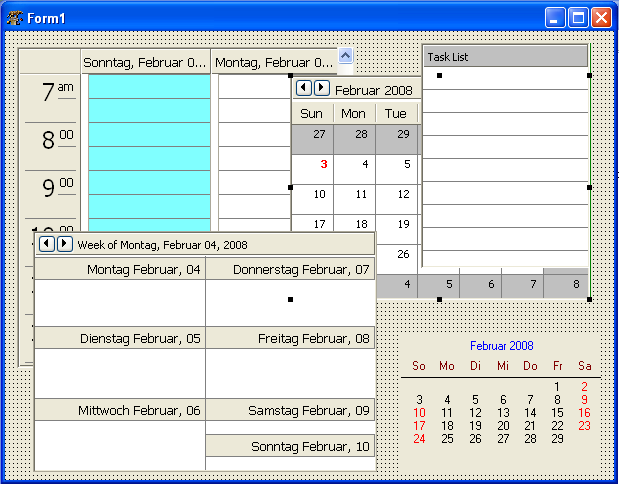
Visual PlanIt - это набор синхронизированных, привязанных к данным, компонентов для добавления в приложения возможностей управления временем, задачами и контактами. Получите Outlook-подобный интерфейс без хлопот.
Этот компонент был разработан для кроссплатформенных приложений.
Скриншоты
Авторы
Авторы: Turbo Power Software
Порт на LCL: Christian Ulrich и Werner Pamler
Лицензия
Загрузка
- Version 1.010: https://sourceforge.net/projects/lazarus-ccr/files/tvplanit/tvplanit-1.0.10.zip/download
- Version 1.08: https://sourceforge.net/projects/lazarus-ccr/files/tvplanit/tvplanit-1.08.zip/download
- Version 1.06: https://sourceforge.net/projects/lazarus-ccr/files/tvplanit/tvplanit-1.06.zip/download
- Version 1.04: https://sourceforge.net/projects/lazarus-ccr/files/tvplanit/tvplanit-1.04.zip/download
SVN
Вы можете проверить последний исходный код из https://lazarus-ccr.svn.sourceforge.net/svnroot/lazarus-ccr/components/tvplanit
Командная строка для этого
svn co https://lazarus-ccr.svn.sourceforge.net/svnroot/lazarus-ccr/components/tvplanit
Сообщения об ошибках / запросы на новые функции
Отчеты об ошибках и запросы функций должны быть отправлены в Lazarus/Free Pascal Bug Tracker; уточняйте, пожалуйста, что для проекта "Lazarus-CCR": http://bugs.freepascal.org/
Журнал изменений: новые функции
- 02.02.2008 - Начальный порт (version 1.03)
- 01.08.2016 - (Почти) полный порт (version 1.04)
- 28.11.2016 - Перетаскивание, хранилище данных mORMot, новые поля, поддержка праздников, designtime и runtime пакеты (version 1.06)
- Май, 2018 - Адаптация к Laz1.8 + поддержка high DPI, хранилища данных json.
- 04.05.2018 - Редактор компонентов NavBar (version 1.10)
- 21.06.2018 - Новые свойства для VpDayView и VpContactButtons, импорт из файлов vCard и iCal (version 1.2.0)
- текущий момент
- (ничего на данный момент)
Несовместимые изменения
- Версия 1.0.4 больше не компилируется с Delphi.
- Начиная с v1.0.11, события VpDayView OnDVBeforeDrawEvent и OnDVAfterDrawEvent имеют дополнительный параметр GutterRect. Это было сделано для возможности пользовательской отрисовки фона события/канавки.
- Начиная с версии 1.0.11, события OnOwnerEditEvent из TVpDayView/TVpWeekView/TVpMonthView, OnOwnerEditContact из TVpContactGrid и OnOwnerEditTask из TVpTaskList имеют новый параметр IsNewEvent, IsNewContact и IsNewTask, чтобы указать пользовательскому редактору, нужно ли редактировать новое событие/контакт/задачу.
Зависимости / Системные требования
- FPC 2.6.4 или новее
- Lazarus 1.4.4 или новее
- Эти версии были доступны на момент написания этого обновления. Не исключено, что пакет можно использовать и с более старыми версиями.
Установка
- Создайте каталог для компонентов, например, lazarus\components\tvplanit
- В этом каталоге разархивируйте файлы из zip-файла или выполните командную строку svn, описанную ранее.
- Откройтеlazarus
- В версии 1.04 библиотеки пакеты времени разработки и [пакеты] времени выполнения находится сведены в один. Откройте пакет laz_visualplanit.lpk из папки source с помощью Package/Open file (-lpk) и нажмите Compile. Нажмите Use(Использовать) > Install(Установить), если вы хотите установить компоненты в IDE.
- Начиная с версии 1.06 библиотека будет разделена на пакеты времени разработки и времени выполнения
- Откройте пакет времени выполнения laz_visualplanit.lpk из корневой папки библиотеки с помощью Package/Open file file (.lpk) и нажмите Compile, чтобы скомпилировать его.
- Откройте пакет времени разработки laz_visualplanit_design.lpk из той же папки, нажмите Use(Использовать) > Install(Установить).
- Если вам нужно хранилище данных Zeos, повторите [манипуляции] с пакетом laz_visualplanit_zeos.lpk (и laz_visualplanit_zeos_design.lpk) из папки source/addons/zeos . Убедитесь, что Zeos компоненты установлены.
Прим.перев.: не помню, с какой точно версии, но в Lazarus 1.8.4 уже была доступна установка этого компонента посредством Online Package Manager c установкой пакета Zeos при необходимости.
Документация
Если вам нужна полная документация пакета VisualPlanIt, получите оригинальный 300-страничный PDF-файл TurboPower с официального сайта SourceForge версии под Delphi (https://sourceforge.net/projects/tpvplanit/files/tpvplanit_docs/).
Использование компонентов планировщика
С чего начать
Простой проект
Вот краткое руководство для ваших первых шагов с компонентами VisualPlanIt.
- Создайте новое приложение. Сохраните его в своей папке.
- Добавьте TPageControl с тремя вкладками. Назовите их "Events"(События), "Tasks"(Задачи), и "Contacts"(Контакты).
- В палитре компонентов найдите вкладку Visual PlanIt.
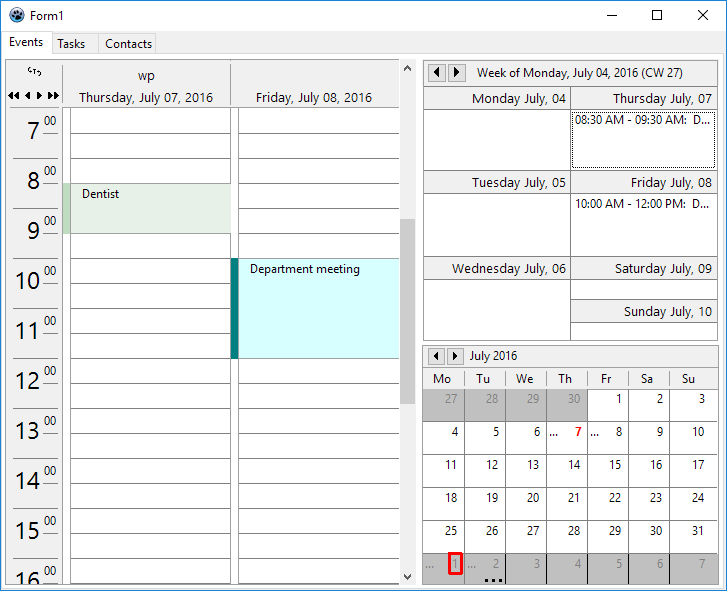
- Выберите TVpDayView и добавьте его на вкладку "Events" PageControl. Это календарь на день, который отображает события (приемы, встречи и т.д.) на весь день с разрешением, определяемым так называемой Granularity(зернистостью).
- Если вы привыкли к [отображению] времени в 24-часовом формате, переключите TimeFormat на tf24Hours.
- Если календарь достаточно широкий, вы можете изменить NumDays на, скажем, 2, чтобы увидеть два дня одновременно.
- Придайте компонентам более современный вид, установив для DrawingStyle значение dsFlat.
- Точно так же вы можете добавить TVpWeekView (календарь на неделю) и/или TVpMonthView (календарь на месяц) на вкладку "Events". Они дают обзор тех же событий, но с меньшим разрешением. Текстовое многоточие ("...") отображается, если текст события не может быть отображен полностью.
- Теперь добавьте TVpTaskList на вкладку "Tasks" в PageControl. Это список дел с указанием сроков. Просроченные задания выделяются красным. Завершенные задачи зачеркиваются. Обратите внимание, что DisplayOptions.ShowCompleted или .ShowAll необходимо пометить, чтобы видеть выполненные задачи.
- Наконец, добавьте TVpContactGrid на вкладку "Contacts" PageControl.
- Опять же, вы можете использовать DrawingStyle dsFlat для более современного вида.
- Поиграйте со свойствами, чтобы настроить все эти визуальные элементы управления в соответствии с вашими предпочтениями. Например, TVpWeekView имеет свойство, определяющее, начинается ли неделя в понедельник или воскресенье (WeekStartsOn).
- Два компонента отсутствуют: DataStore и ControlLink.
- Datastore - это компонент, в котором хранятся данные, отображаемые в визуальных элементах управления. Пакет Visual PlanIt содержит ряд предопределенных хранилищ данных - см.ниже. Мы выбираем здесь TVpIniDatastore или TVpXmlDatastore, которые хранят данные в INI или XML-файле - эти хранилища не требуют базы данных, как другие хранилища данных.
- В свойстве Filename введите имя для файла хранилища данных, например, data.ini или data.xml, соответственно. Использование относительного имени файла здесь означает, что путь будет относительно местоположения exe-файла программы, что удобно для этого урока. Однако в «реальном» приложении абсолютный путь может быть предпочтительным. И также может быть полезно ввести имя файла во время выполнения, например, в обработчике событий FormCreate.
- Если имя файла известно во время разработки, вы можете установить для AutoConnect значение true, чтобы автоматически открывать хранилище данных при запуске программы. Если имя файла указано во время выполнения, оставьте AutoConnect в false и установите для свойства Connected хранилища данных значение true.
- ControlLink автоматически устанавливает связь между хранилищем данных и визуальными элементами управления и гарантирует, что элементы управления получают свои данные, если это необходимо, и синхронизируются.
- Теперь пришло время запустить программу
- Как добавить данные? Это делается двойным щелчком по любому из добавленных нами элементов управления, чтобы открыть специальный встроенный редактор для удобного ввода необходимых данных.
- Однако в первый раз появляется диалоговое окно, в котором говорится, что "no resources have been defined"(ресурсы не определены). Resource - это все, что может администрироваться инструментами VisualPlanIt, например, сотрудник, зал заседаний, книжная библиотека и т.д. Введите имя ресурса. Если ваша программа будет работать с различными ресурсами, вы можете добавить [их список в виде] TVpResourceCombobox, чтобы выбрать ресурс, необходимый для запуска программы. Убедитесь, что вы используете уникальные имена ресурсов, потому что VisualPlanIt будет выдавать исключение дубликата ресурса в противном случае.
- При повторном запуске программы в следующий раз вы заметите, что данные больше не видны. Нет причин для беспокойства - данные все еще там, но программа просто не знает, какой ресурс открыть. Введите этот код в событие FormCreate после подключения к хранилищу данных:
procedure TForm1.FormCreate(Sender: TObject);
begin
  // Используйте этот код, если имя файла не задано в Object Inspector...
  VpXmlDatastore1.FileName := name_of_the_datastore_file;
  // ... и хранилище данных не подключено автоматически
  VpXmlDatastore1.Connected := true;
  // Этот код выбирает первый ресурс (index 0), найденный в хранилище данных
  if VpXmlDatastore1.Resources.Count > 0 then
    VpXmlDatastore1.Resource := VpXmlDatastore1.Resources.Items[0];
end;
Категории событий
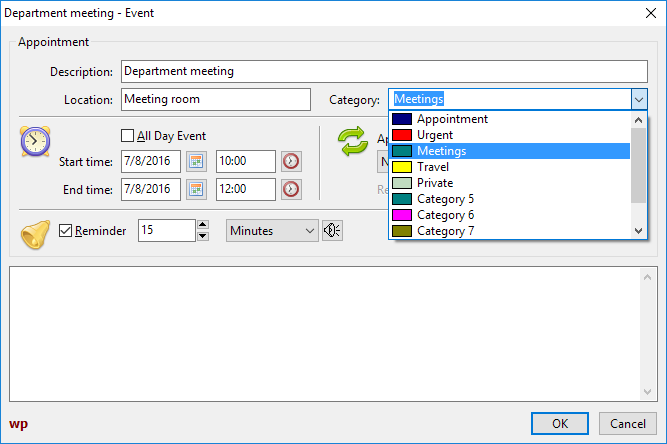
Редактор событий используется для ввода или редактирования деталей события. Вы найдете здесь комбинированный список с надписью "Category"(Категория). Элементы комбинированного списка можно использовать для классификации событий, например "Business"(Деловые), "Private"(Личное), "Birthday"(День рождения) и т.д. Однако эти элементы имеют только обобщенные имена, такие как "Category 1", "Category 2" и т.д. Вы можно выбрать более описательные имена, посетив свойство хранилища данных CategoryColorMap. Поле "Descriptions"(Описания) определяет текст, который будет отображаться в выпадающем списке. Чтобы иметь возможность различать категории в элементе управления DayView, вы также можете установить здесь цвет фона и растровое изображение.
Воспроизведение звука события
Компоненты планировщика готовы воспроизводить звук в заранее определенное время до наступления события. Для этого необходимо установить флажок "Reminder"(Напоминание) в редакторе событий.
Есть несколько способов настроить звук:
- Хранилище данных предоставляет свойство DefaultSound. Указанный здесь звуковой файл будет воспроизводиться всякий раз, когда происходит событие с установленным флажком "Reminder".
- Кроме того, для каждого конкретного события можно выбрать отдельный звуковой файл, щелкнув значок громкоговорителя рядом с интервалом напоминания.
В Windows звуки воспроизводятся автоматически без дополнительного кода, потому что там встроены универсальные звуковые утилиты. В Linux, однако, это менее стандартизировано. Но хранилище данных предоставляет событие OnPlaySound, где может быть выполнена правильная команда воспроизведения звука. Проект fulldemo в папке examples содержит модуль, который проверяет звуковые движки, обычно доступные в различных системах; этот модуль представляет собой адаптированную версию playsound component от Gordon Bamber в Lazarus components and code repository (https://sourceforge.net/p/lazarus-ccr/svn/HEAD/tree/components/playsoundpackage/).
Хранилища данных
Хранилища данных отвечают за постоянное хранение записей о событиях, задачах и контактах.
Предком этой иерархии классов является TVpCustomDatastore. Он реализует базовую функциональность и предоставляет фундаментальные абстрактные методы, такие как LoadEvents, LoadTasks, LoadContacts, PostResources, PostEvents, PostTasks, PostContacts. Его класс-член Resources (type: TVpResources) хранит все ресурсы в списке как элементы TVpResource. Такой элемент ресурса, в свою очередь, содержит другие списки: Расписание, Задачи и Контакты для всех записей событий, задач и контактов. Доступ к выбранному в данный момент ресурсу можно получить из свойств Resource или ResourceID хранилища данных (последний представляет собой уникальный числовой идентификатор для идентификации ресурса).
TVpCustomDBDatastore, унаследованный непосредственно от TVpCustomDatastore. Это еще один (псевдо-) абстрактный класс, который обеспечивает базовую функциональность базы данных посредством четырех наборов данных: ResourceTable, EventsTable, TasksTable и ContactsTable. Поскольку базы данных имеют очень эффективные методы поиска и фильтрации, эти хранилища данных предоставляют свойство DayBuffer, которое определяет диапазон дат до и после текущей выбранной даты, для которой загружаются записи.
TVpIniDatastore
Это простое хранилище файловых данных, которое наследуется от TVpCustomDatastore. Он хранит записи данных в простой файловой структуре ini. Имя ini-файла должно быть указано в соответствующем свойстве. Файл загружается после того, как хранилище данных было создано, если свойство времени разработки AutoConnect имеет значение true или когда свойство среды выполнения Connected переключено на значение true. Файл сохраняется автоматически, когда Connected возвращается к false - это происходит до уничтожения хранилища данных.
Демонстрационный проект examples/datastores/ini является примером того, как можно использовать хранилище данных ini.
TVpXmlDatastore
Это еще один простой файл хранилища данных. Он работает так же, как хранилище данных ini, за исключением того, что этот файл теперь является XML-файлом. Дерево XML-узлов хранилища данных может быть вставлено в любой существующий XML-файл, например, файлы, записанные TXMLDataStorage. Для этого необходимо указать узел, к которому будут присоединены узлы хранилища данных (свойство ParentNode).
Посмотрите демонстрационный проект в examples/datastores/xml, чтобы увидеть, как работает хранилище данных xml.
TVpBufDSDatastore
Следующие хранилища данных наследуются от TVpCustomDBDatastore. Первая, TBufDSDataset, использует простые таблицы TBufDataset для хранения данных планировщика. Четыре обязательных файла называются "Resources.db", "Events.db", "Contacts.db" и "Tasks.db" и хранятся в папке, указанной свойством Directory. Если AutoCreate имеет значение true, тогда таблицы создаются автоматически при первом запуске программы; в противном случае должен быть вызван метод хранилища данных CreateTables.
Применение этого хранилища данных продемонстрировано в examples/datastores/bufdataset и в examples/fulldemo.
TVpSqlite3Datastore
Это хранилище данных является специализированным хранилищем для таблиц SQLite3. Для этого используются компоненты SQLDB. Вы должны добавить TSQLite3Connection и TSQLTransaction в форму, связать их вместе, используя соответствующие свойства. Свяжите SQLite3Connection с Connection хранилища данных. Требуемые SQLQueries создаются автоматически, если AutoCreate хранилища данных имеет значение true или после вызова CreateTables. База данных хранится в файле, указанном DatabaseName соединения.
Проект в examples/datastores/sqlite3 демонстрирует, как можно использовать хранилище данных sqlite3.
TVpFirebirdDatastore
A Firebird database provides the storage for TVpFirebirdDatastore. Again, SQLDB components are used here. To establish a connection to the database, a TIBConnection must be linked to the datastore's Connection. It must provide all information to connect to the database, such as database name, user name and password. In addition, a TSQlTransaction component is needed. The database should be created by the tools provided by Firebird or by third-party database administration tools. It is possible to do this also from the datastore, but this results in an exception. If the datastore's AutoCreate the required tables are created automatically when not found; alternatively call CreateTables for the datastore.
Usage of the datastore is demonstrated in examples/datastores/fb.
TVpZeosDatastore
The TVpZeosDatastore works with the ZEOS database components. Since they are not contained in the standard Lazarus distribution it is contained in a separate package, laz_visualplanit_zeos, which is found in the source/addons/zeos folder and must be installed after laz_visualplanit.
A TZConnection is required to establishe a connection to the database. The tables are created internally, either automatically if AutoCreate is true, or manually by calling CreateTable.
The demo project can be found in examples/datastores/zeos.
TVpFlexDatastore
In the database-aware datastores mentioned so far, the tables are created by the datastore. This makes sure that the fields are named in the way as expected by the datastore. If, on the other hand, tables are already existing or are provided by other applications it is very likely that field names will not be reckognized. TVpFlexDatastore can be a solution. Its name indicates that this is a very flexible datastore. In particular, it is possible to link to any database system if a TDataset-descendent is available.
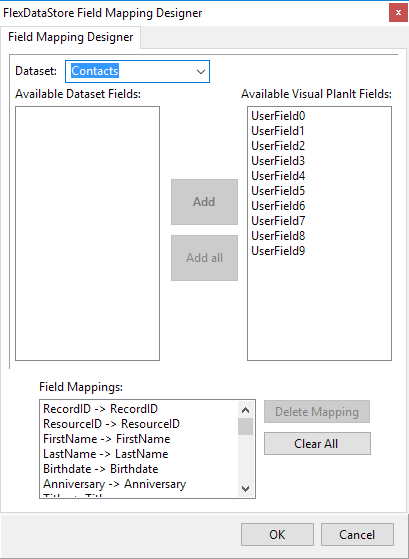
You must add four TDataset components to the form, each one corresponding to one of the Resources, Events, Contacts, and Tasks data, and link them to the DataSsource of the datastore via TDataSource components. Then double-click on the TvVpFlexDatastore to open the FieldMapper. This is a tool to assign the database fields to the internal fields of the datastore. For each database field that you want to include in the planner select the corresponding datastore field in the right list box. After clicking "Add" the pair of fields is shown in the "Field Mappings" listbox.
There are two sample projects
- examples/datastores/flex/access demonstrates how an MS Access database can serve for storage using an ODBCConnection and other SQLDB components (there is also a readme.txt with step-by-step instructions).
- examples/datastores/flex/sqlite3 repeats the same with a SQLite3 database.
Other datastores
The following datastores from the original Delphi distribution are included in the source folder, but not added to the package because they require the BDE which is not available for Lazarus:
- TVpBDEDatastore for database access by means of the Borland Database Engine (BDE) (unit vpbdeds)
- TVpAdvDatastore for Advantage Database (unit vpadvds)
- TVpFF2Datastore for FlashFiler 2 databases (unit vpff2ds)
- TVpDBISAMDatastore for DBISAM database access (unit vpdbisamds)
- TVpSQLDatastore (unit vpsqlds): This is a very general datastore for any sql database. An interfaced class to the TDataset-descendent must be provided, and there must be a class specifying the particular sql dialect. For application in Lazarus, some restructuring of BDE-related properties will be required. The package contains an example for BDE access.
Overlaying events
The DayView and WeekView components primarily display events of a single resource. It is possible, however, to switch into an overlay mode where other resources can be displayed within the same controls. This can be achieved by assigning a TVResourceGroup to the resource (property Group):
type
  TVpOverlayPattern = (opSolid, opClear, opHorizontal, opVertical, opFDiagonal, opBDiagonal, opCross, opDiagCross);

  TVpOverlayDetail = (odResource, odEventDescription, odEventCategory);
  TVpOverlayDetails = set of TVpOverlayDetail;

  TVpResourceGroup = class
    //...
    property Caption: String;
    property Count: Integer;
    property Items[AIndex: Integer]: TVpResource;
    property Pattern: TVpOverlayPattern;
    property ResourceID: Integer;
    property ReadOnly: boolean read FReadOnly;
    property ShowDetails: TVpOverlayDetails;
  end;

procedure TMainForm.CreateResourceGroup;
const
  NAME_OF_GROUP = '';  // empty --> use resource descriptions instead
  PARENT_ID = 1;
  OVERLAYED_ID = 2;
var
  datastore: TVpCustomDatastore;
  grp: TVpResourceGroup;
begin
  datastore := VpControlLink1.Datastore;
  grp := datastore.Resources.AddResourceGroup([PARENT_ID, OVERLAYED_ID], NAME_OF_GROUP);
  grp.ReadOnly := true;
  grp.Pattern := opDiagCross;
  if datastore.Resource <> nil then
    datastore.Resource.Group := grp else
    datastore.Resource.Group := nil;
  datastore.RefreshEvents;  // or: datastore.UpdateGroupEvents;
end;
The IDs of the overlayed resources are specified as an array in the first parameter of the call to AddResourceGroup. The first id plays a special role: it refers to the resource to which the group is attached. If this resource is displayed in a Dayview or WeekView component then the events of the other specified ID(s) are overlayed within the same control.
The level of detail visible to the user seeing overlayed events is controlled by the property ShowDetails of the resource group. By default, only the name of the overlayed resource is visible. If more details are to be exposed you can add the other elements of TVpOverlayDetails. The background of overlayed events in the dayview is hatched as specified by the Pattern property of the resource group if the event category is not excluded from the visible details; otherwise the event is drawn as specified by the property HiddenCategories of the Datastore.
Editing, deleting, drag-and-drop of overlayed events is off by default, but can be allowed by setting the ReadOnly property of their resource group to false.
In order to turn resource groups on and off the context menu of DayView and WeekView components is extended by a corresponding submenu. The submenu contains an item "none" meaning "no overlayed events" as well as an item for each resource group in which the currently selected resource is the parent. The caption of the menu items is defined by the (optional) second parameter of the AddResourceGroup call (NAME_OF_GROUP); if empty the group name is derived from the descriptions of the overlayed resources.
Printing and print preview
The VisualPlanIt package contains routines for printing the planner controls. Even a print preview is implemented. The printing process is defined by means of templates which are called "print formats" here. They can be created at designtime or by means of an xml file loaded at runtime, contain a list of the components to be printed.
The heart of printing support is the TVpPrinter class - it is accessible by the Printer property of the TVpControlLink. It contains extra information needed for the printing process and contains a list of the available PrintFormats.
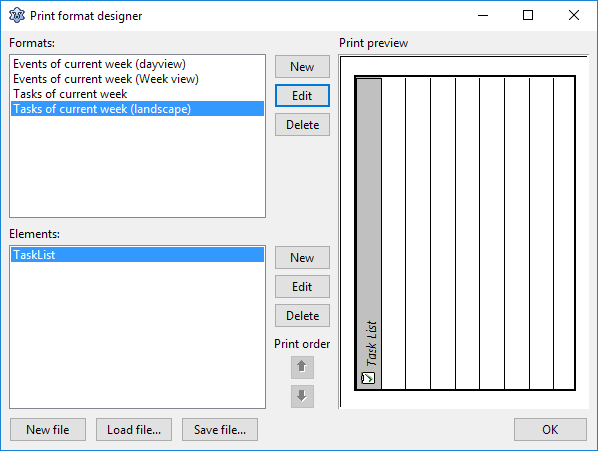
In order to quickly access the print format designer double-click on the TVpControlLink component. Click on the upper "New" button to open the basic format editor. Here you can assign a reasonable name to the print format. Clicking on the lower "Edit" opens the "Element" editor - this is the tool to define the contents on the print print format, similar to a report designer, however less comfortable. In addition to the planner controls, DayView, WeekView, MonthView, TaskList and ContactGrid, the editor allows also to add additional text and shape objects to the format. Multiple elements can be contained within the same format. Position the elements by using the Top/Left/Width/Height specifications at the right. In addition, the entire format page can be rotated in 90° steps.
A print preview can be generated by means of a TVpPrintPreview component. Assign the ControlLink of the form to the ControlLink and the Printer of the Printers units to the Printer property of the preview component. For printing to work correctly, you must have the package Printer4Lazarus in the requirements of the project; this can be done most easily by adding a standard TPrintDialog to the form which you will probably need anyway. Open the print preview by calling its Execute method. It should be mentioned that the print preview itself does not issue any printing commands. Therefore, extra printing code must be written if the user decides to initiate a print-out from the preview, something like this:
if VpPrintPreviewDialog1.Execute then
  if PrintDialog1.Execute then begin
    Printer.BeginDoc;
    try
      VpPrintPreviewDialog1.ControlLink.Printer.Print(
        Printer,
        VpPrintPreviewDialog1.StartDate,
        VpPrintPreviewDialog1.EndDate
      );
    finally
      Printer.EndDoc;
     end;
  end;
See the fulldemo project in the examples folder for a worked-out example.
Localization
All internal strings used by the VisualPlanIt package can be localized by means of the translation utilities available within Lazarus. The translated po files can be found in the folder languages of the distribution. Copy them to the language folder of your application, and translate them by calling
uses
  translations;
var
  langdir: String;  // language folder of your application
  lang: String;     // language abbreviation, e.g. "de" for German
//...
TranslateUnitResourceStrings('vpsr', langdir + 'vpsr.' + lang + 'po');In addition to providing translated strings a variety of date/time related properties of the planner controls should be adapted:
- Set VpDateView.DateLabelFormat to DefaultFormatSettings.LongDateFormat, dto. with VpWeekView.DayHeadAttributes.DateFormat and VpWeekView.DateLabelFormat.
- Set VpMonthView.DatelabelFormat to the string 'mmmm yyyy' which means "month in words + year".
- Set VpTaskView.DisplayOptions.DueDateFormat to DefaultFormatSettings.ShortDateformat.
- Determine the TVpTimeFormat of your system by calling GetTimeFormat (in Unit vpmisc). The result is either tf12Hour or tf24Hour and should be assigned to the TimeFormat properties of VpDayView, VpWeekView and VpMonthView.
- Set the properties WeekStartsOn of VpMonthView and VpWeekView to the day code of the first day of a week (1 = Sunday, ..., 7 = Saturday).
Finally, the TVpControlLink implements procedures for localizing addresses in the Contact Editor Dialog. For this purpose, the file vplocalize.xml accompanies the VisualPlanIt package. It contains rules for construction of addresses in the correct format varying from country to country. If this filename is assigned to the property LocalizationFile of the ControlLink then these rule are effective when the Contact Editor Dialog is created. Please note that this file is not translated by the po files.
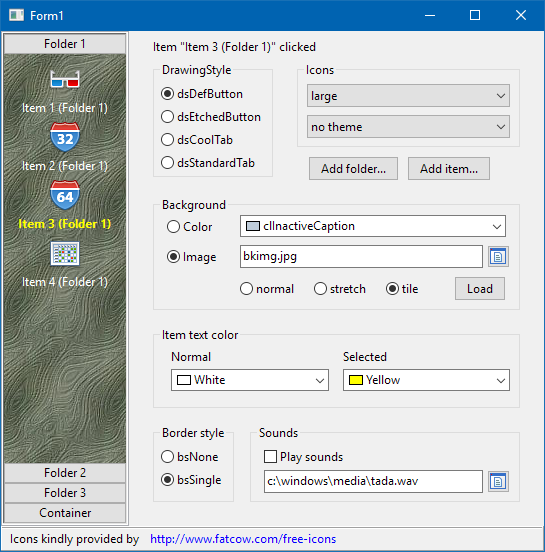
TVpNavBar, seen in the left of this screenshot of the navbar demo, is a navigation tool smiliar to the one known from Outlook. It consists of several folders represented by button-like controls and several items - these are the labelled icons in the large space between two buttons. The folder button - which can be drawn in several button- or tab-like styles - is always shown above the associated item area. Clicking on a folder divides the stack of folders in an upper and lower part, and displays the items assigned to this folder between the corresponding folder at the top and the next folder at the bottom. The index of the currently expanded folder is given by the property ActiveFolder, and the index of the clicked items within this folder is given by property ActiveItem. An event OnItemClick fires when an item is clicked, it has the index of the clicked item as a parameter.
An icon can be assigned to each item. These images are collected in the image list assigned to the property Images of the navigation bar. The images normally should be 32x32 pixels. The property IconSize of each folder determines whether these images are displayed directly as "large images" or reduced by a factor 2 (16x16 pixels) as "small images". The down-scaling is done by the component.
Populating a TVpNavBar at designtime is easy if the version of VisualPlanIt is at least 1.0.10 in which the component editor of the NavBar is functional. Just double-click on the component, or select "Layout Tool..." from the context menu of the component. This opens the component editor displayed here as a screenshot. It contains three listboxes:
- The left listbox shows the folders found in the navigation bar. Click on the "+" button to add a new folder, "-" to delete the selected folder, or the "up"/"down" arrows to rearrange the folders. The properties of the selected folder are displayed in the object inspector:
- Specify the Caption of the folder - this is the text to appear on the button/tab of the folder.
- Leave IconSize at isLarge if you want to use large icons for this folder's items. In this case, icons and their captions will be centered, the caption will be below the icon and word-wrapped if the text is longer than the width of the NavBar. If you select isSmall, on the other hand, icons and captions are left aligned, and the (non-wrapped) captions are drawn at the right of the icons. IconSize can change from folder to folder.
- Do not set the FolderType to ftContainer - this feature for adding arbitrary controls to the folder is not working in Lazarus at the time of this writing.
- The center listbox shows the items assigned to the folder highlighted in the left list. Caption and icon of this item are displayed in each line. Again click on the "+", "-", or "up"/"down" buttons to add, delete or rearrange the items. And again, the properties of the selected item can be changed in the object inspector. Besides the Caption already mentioned for the folders, there is also a property ImageIndex which specifies the icon displayed for the item. The image index refers to the ImageList assigned to the property Images of the NavBar.
- The right listbox contains all the images found in the ImageList. It is intended to simplify the assignment of icons to items: Select the item for which an icon is to be selected. pick the icon in the right image list and click on the arrow between the item and images listboxes.
If the VisualPlanIt version is older than version 1.0.10, then getting folders and items into the NavBar is a bit more complicated because the component editor had not yet been ported/adapted to Lazarus. In this case, it is best to learn this task by means of the object inspector:
- Add a TVpNavBar component to the form.
- Add an imagelist with, ideally 32x32 images, and assign it to the Images property of the NavBar.
- Click on the "..." button next to FolderCollection to open the collection editor for the folders.
- Click "Add" to add a new folder.
- Select the new folder in the collection editor, its properties appear in the object inspector and can be changed there.
- In order to add items to the folder click on ItemCollection. This opens the collection editor for the items belonging to the current folder.
- Again click "Add" to create a new item, and select it in the collection editor to enter its properties in the object inspector.
Gadgets
In addition to the planner components the Visual PlanIt package contains also two stand-alone gadgets:
TVpLEDLabel
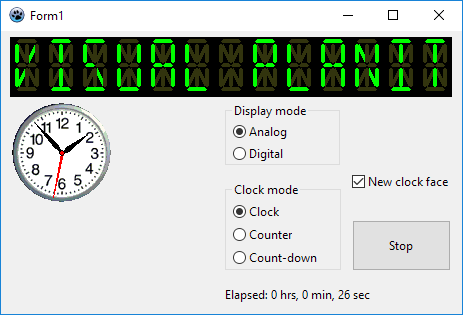
This is a 14-segment LED display which can display any ASCII string. The string is defined by means of the property Caption, but the count of LED characters must be defined explicitly using the property Columns
TVpClock
This is a digital or analog clock - depending on the property DisplayMode. A variety of settings can be adjusted for each mode separately by using the properties in AnalogOptions and DigitalOptions. The properties are pretty much self-explanatory, except maybe the DigitalOptions.MilitaryTime which activates the 24-hour display if true, or the 12-hour am/pm mode if false. The AnalogOptions.ClockFace replaces the default-drawn clock face by a bitmap - see screenshot above.
With the property ClockMode the operation of the clock can be changed from standard clock (count-up or count-down timer, cmClock, cmTimer, cmCountdownTimer, respectively).
