Cody
"Cody" is a Lazarus design time package extending the IDE with some advanced code tools for power users. It is located in the Lazarus sources components/codetools/ide/cody.lpk since Lazarus 0.9.31.
Overview
Cody adds the following items to the IDE:
- PPU files of project - a dialog showing stats about all used ppu files
- Insert file at cursor - a dialog to select a file to replace the current selection
- Add call inherited - adds a statement "inherited FunctionName(params);"
- Add Assign method - a dialog to add an Assign method to a class
- Explode a "With" block - removes a "With" block and fixes all identifiers
- Add a "With" block - add a "With" block and remove identifiers
- Declare Variable - dialog to declare a new variable
- Unit / Identifier Dictionary - Database of all identifiers the IDE has seen
PPU files of project
- Menu item: Project / Show ppu files of project
- Requires: A compiled project
- Key name: Show used .ppu files ... (in the IDE under options Editor / Key mapping)
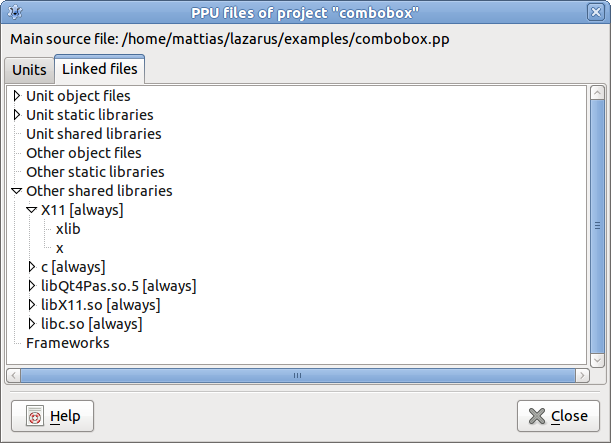
This dialog provides statistics about all the current project's used .ppu and .o files.
Note: The codetools will try to parse all used .ppu files. The codetools uses its own ppu parser (not the compiler's parser). The advantage of this is that codetools can read many different versions of ppu. The drawback is that it might not be able to read the very latest version. Cody uses the sources as fallback.
Units
The first page Units shows which unit uses what other units, and where they are used. Note: If a .ppu file cannot be parsed the source (.pas, .pp) will be parsed instead of the .ppu.
You can sort the list by double-clicking on a column header.
- General
- Source: the full file name of the unit source file
- PPU: the full file name of the unit ppu file.
- Uses: This lists all units used by that unit.
- Used by: This lists all units that use the current unit directly.
- Uses path: This gives one path from the project main source to the unit. This is not necessarily the shortest path.
Linked Files
The second page Linked Files shows what files, libraries and frameworks are used by the project and what unit links them in.
- Hint: Double click on an unit to jump to the unit on the Units page.
- Note: If a .ppu file cannot be parsed, there is no fallback. There will be no information displayed about that unit's linked files.
Insert file at cursor
- Requires: a file in the source editor
- Menu item: Source Editor / popup / Source / Insert file at cursor ...
- Shortcut name: Insert file at cursor (in the IDE under options Editor / Key mapping)
This opens a file dialog. Select a file, which will be inserted at the current source editor position. If some text was selected, it will be replaced.
Insert call inherited
- Requires: cursor in a method implementation
- Menu item: Source Editor / popup / Source / Add call inherited
- Shortcut name: Insert call inherited (in the IDE under options Editor / Key mapping)
This adds a call to the inherited method with all parameters. For example:
type
  TMyClass = class(TComponent)
  public
    constructor Create(AOwner: TComponent); override;
  end;

constructor TMyClass.Create(AOwner: TComponent);
begin
  |
end;
This will add inherited Create(AOwner);:
constructor TMyClass.Create(AOwner: TComponent);
begin
  inherited Create(AOwner);
end;
If the method is a function and the current line is empty it will prepend a Result:=.
function TMyClass.ExecuteAction(Action: TBasicAction): Boolean;
begin
  Result:=inherited ExecuteAction(Action);
end;
Add Assign method
- Requires: cursor in a class
- Menu item: Source Editor / popup / Refactor / Add Assign method ...
- Shortcut name: Add Assign method (in the IDE under options Editor / Key mapping)
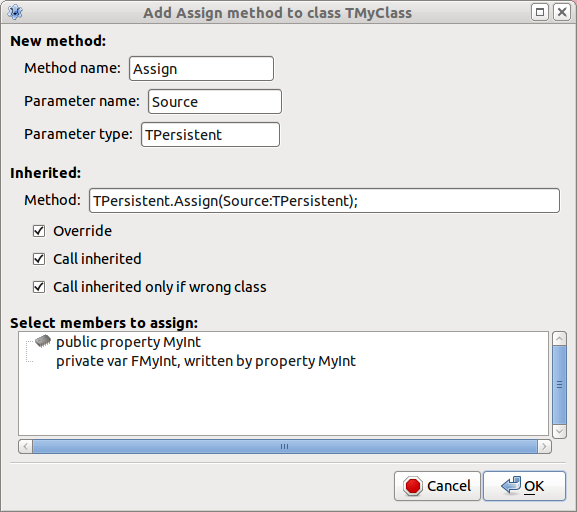
If you are using Object Pascal, then you often need to copy an object and so you will probably often write an Assign method. This tool generates the method automatically for you and gives you a dialog to quickly select the members to copy. Here is an example of a produced method code:
type
  TMyClass = class(TComponent)
  private
    FMyInt: integer;
  public
    procedure Assign(Source: TPersistent); override;
    property MyInt: integer read FMyInt write FMyInt;
  end;

procedure TMyClass.Assign(Source: TPersistent);
var
  aSource: TMyClass;
begin
  if Source is TMyClass then
  begin
    aSource:=TMyClass(Source);
    MyInt:=aSource.MyInt;
  end else
    inherited Assign(Source);
end;
- Method name: type in the name of the new method. It is automatically checked if there is already such a method or if an ancestor has inherited one.
- Parameter name: the parameter name is taken from the inherited method, otherwise Source.
- Parameter type: the parameter type is taken from the inherited method, otherwise TObject. If this type is different than the current class an if-then-else block is added.
- If there is an inherited method:
- Check 'Override' to override it. This appends the override method modifier.
- Check 'Call inherited' to add a line 'inherited'.
- Check 'Call inherited only if wrong class' to call the inherited method only in the else part. This is needed for all direct descendants of TPersistent.
- Select members to assign:
- This lists all variables and all properties that are assignable (readable and writable).
- It also shows if a variable is written by a property.
- You can select/unselect by clicking on a member.
Explode a "With" block
This tool removes a With and inserts the with expression in front of each identifier needing it.
- Requires: cursor on a With expression (e.g. the variable between the keywords With and Do)
- Menu item: Source Editor / popup / Refactoring / Remove With block
- Shortcut name: Remove With block (in the IDE under options Editor / Key mapping)
For example:
with Button1 do begin
  Name:='Button1';
  Caption:='Ok';
end;
becomes:
Button1.Name:='Button1';
Button1.Caption:='Ok';
Add a "With" block
This tool adds a With around the selection of the Source Editor and removes all occurrences of the expression.
- Requires: selected Pascal statements in the Source Editor with at least one expression to shorten
- Menu item: Source Editor / popup / Refactoring / Add With block
- Shortcut name: Add With block (in the IDE under options Editor / Key mapping)
For example:
Button1.Name:='Button1';
Button1.Caption:='Ok';
becomes:
with Button1 do begin
  Name:='Button1';
  Caption:='Ok';
end;
Beware: This function does not check for conflicts. For example:
procedure TForm1.Button1Click(Sender: TObject);
begin
  Button1.Enabled:=Enabled;
end;
When you enclose the assignment the function will stupidly convert to:
procedure TForm1.Button1Click(Sender: TObject);
begin
  with Button1 do begin
    Enabled:=Enabled; // wrong
  end;
end;
Notes:
- The function does *not* check if the change breaks the code.
- When you want to enclose a whole procedure, select all statements, excluding the begin/end keywords.
- The function does not check if the selection starts or ends within a statement. It will enclose only the text within the selection, no matter if this results in wrong code. Undo is your friend.
Declare Variable
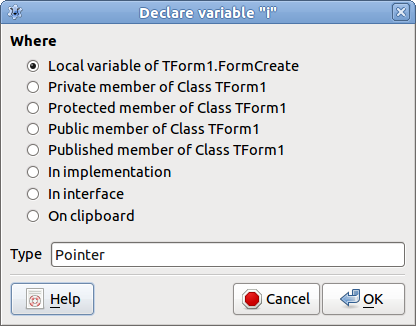
This tool is an interactive version of Variable Declaration Completion. It tries to guess the type and context of the identifier at cursor and gives you a list of possible places to declare the variable.
- Requires: cursor on an undeclared identifier in a statement.
- Menu item: Source Editor / popup / Refactoring / Declare Variable
- Shortcut name: Declare Variable (in the IDE under options Editor / Key mapping)
For example:
procedure DoSomething;
begin
  i:=3;
end;
Place the cursor on the i and invoke the dialog. Select "local variable" and click Ok. The result is
procedure DoSomething;
var
  i: Integer;
begin
  i:=3;
end;
You can declare member variables:
procedure DoSomething(A: TMyClass);
begin
  A.Identifier:='Declare a variable in TMyClass';
end;
You can declare variables on the clipboard. This gives you superior control where the new variable is declared. Move the source editor cursor to the destination and paste (e.g. Ctrl+V). Cody will automatically create a new var section if needed.
Features
- keeps the cursor. You can quickly define a variable without moving/changing your source editor.
- Guesses type of assignments: identifier:=<expression>, this includes for i:=0 to
- Guesses type of for in: for identifier in <list type>
- nested procedures: allows to define a variable on every level
- with blocks: every with adds its contexts
- class sections: private, protected, public, published
- interface, implementation, program, package, library
- checks if identifier is already declared
- automatically adds the needed unit for the type
- it can create the declaration on the clipboard. This creates a special format on the clipboard containing all needed information so that a paste will add the needed unit to the uses section. Or you can paste it into another application.
Unit / Identifier Dictionary
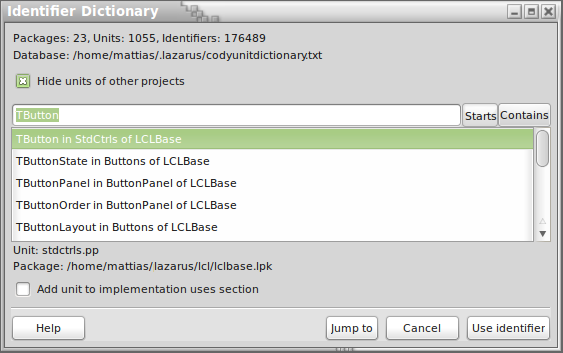
Cody keeps track of all global identifiers the IDE has ever encountered. This tool lets you browse this IDE history. You can jump to the identifier in the source editor or you can use the identifier. Using means inserting/replacing the identifier at the current source editor position, extending the uses section and extending the project/package dependencies. In other words, this tool is like identifier completion, but with a far-reaching search scope.
- Requires: placing the cursor on an identifier in the source editor.
- Menu item: Source Editor / (right-click to get the popup menu) / Source / Show Unit/Identifier Dictionary... OR (main menu) Source / Show Unit/Identifier Dictionary...
- Shortcut name: Show unit / identifier dictionary (in the IDE under Options / Editor / Key mapping)
- The top line gives a statistical summary about the current database.
- Hide units of other projects: By default the dialog shows only the normal identifiers (that is: current project units, package units, and FPC units). If you want data from a unit in some other project, it is best to put that unit into a package. Nevertheless this dialog supports using units of other projects too. Doing so will extend the unit search path.
- Filter: This text filters the listed identifiers. It works case-insensitively. Exact matches are shown first. If an identifier is defined in more than one unit, there will be an entry for each unit. Note that this is only a history. The data may be outdated.
- Starts: Shows only identifiers that begin with the given text.
- Contains: Shows only identifiers that contain the given text.
- You can use Up and Down keys to move the selected identifier.
- Unit, Package: This means the selected identifier's unit/package file.
- Add unit to implementation uses section: When using an identifier this tool checks if the unit is already in the uses section and will add it if needed. If the source editor is in the implementation section you can choose which uses section to use.
- Help: Opens this help page.
- Jump to: Opens the package if needed, opens the file in the source editor and jumps to the identifier. If the identifier has vanished since the last time you opened the file in the IDE, you will get an error.
- Cancel: Closes the dialog without any action.
- Use identifier: Opens the package if needed. Replaces the current identifier in the source editor. If needed the uses section(s) is/are updated. If needed, CodeTools adds a package dependency and/or extends the unit search path. It does some sanity checks for possible unit or package conflicts and may give an error. For instance, if the identifier has vanished since the last time you opened the file in the IDE, you will get an error.
- Options: Under Tools / Options / Codetools / Cody
- Load dictionary after X seconds: The dictionary is not loaded immediately on start up, so the IDE starts quickly even if the CodeTools database is extensive. The database is loaded when needed, or after a pause whose length you can specify here.
- Save dictionary every X minutes: The dictionary is updated on idle whenever the IDE parses fresh source text. The dictionary is written to disk at intervals. It is written in another thread, so you won't notice it.
- Save dictionary now: This forces an immediate write to disk.
Creating a new dockable IDE Window
Cody adds a new form type "IDE Window, dockable", which allows to easily create a new dockable IDE window like the Code Explorer or the FPDoc editor.
- Requires: A designtime package
- Menu item: Package Editor / Add / IDE Window, dockable
It also generates code to register a menu item in the View menu and a shortcut.
Usage:
- Create the form via Package Editor / Add / IDE Window, dockable
- Change the names and the captions
- Save it
- Install the package and restart the IDE
- You can access your new window via the View menu.
See also
- Lazarus IDE Tools - A tutorial about the built-in tools of the standard IDE
- Codetools - How to program new tools yourself
- Extending the IDE - How to write your own codetools plugins for the IDE.


