Difference between revisions of "BGRABitmap tutorial 11/fr"
(créée) |
|||
| Line 159: | Line 159: | ||
[[BGRABitmap tutorial 10/fr|Tutoriel précédent (plaquage de texture)]] [[BGRABitmap tutorial 12/fr|Tutoriel suivant (fonctions texte)]] | [[BGRABitmap tutorial 10/fr|Tutoriel précédent (plaquage de texture)]] [[BGRABitmap tutorial 12/fr|Tutoriel suivant (fonctions texte)]] | ||
| − | [[Category:Graphics]] | + | [[Category:Graphics/fr]] |
Revision as of 10:44, 3 August 2011
│ Deutsch (de) │ English (en) │ español (es) │ français (fr) │
Accueil | Tutoriel 1 | Tutoriel 2 | Tutoriel 3 | Tutoriel 4 | Tutoriel 5 | Tutoriel 6 | Tutoriel 7 | Tutoriel 8 | Tutoriel 9 | Tutoriel 10 | Tutoriel 11 | Tutoriel 12 | Edit
Ce tutoriel montre comment combiner les transformations.
Transformation affine d'un dégradé radial
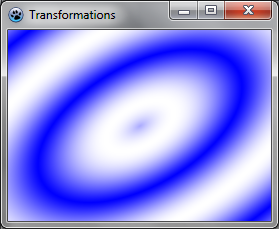
Voici une transformation affine appliquée à un dégradé de la même façon que nous avons fait avec les textures : <delphi>uses BGRAGradientScanner, BGRATransform;
procedure TForm1.FormPaint(Sender: TObject); var image: TBGRABitmap;
   grad: TBGRAGradientScanner;
   affine: TBGRAAffineScannerTransform;
begin
image := TBGRABitmap.Create(ClientWidth,ClientHeight, BGRABlack );
grad := TBGRAGradientScanner.Create(BGRA(0,0,255),BGRAWhite,gtRadial,PointF(0,0),PointF(1,0),True,True);
 affine := TBGRAAffineScannerTransform.Create(grad);
 affine.Scale(150,80);
 affine.RotateDeg(-30);
 affine.Translate(ClientWidth/2, ClientHeight/2);
image.Fill(affine);
 affine.free;
 grad.free;
 image.Draw(Canvas,0,0,True);
 image.free;
end; </delphi>
Le dégradé de base est radial, centré à l'origine (0,0) et de rayon 1.
La transformation affine effectue les actions suivantes :
- étirer le dégradé à une taille de 150x80
- tourner de 30 degrés dans le sens inverse des aiguilles d'une montre
- centrer sur la fenêtre
L'instruction Fill dessine le résultat sur l'image.
Exécution du programme
Vous devriez obtenir une ellipse avec un dégradé bleu et blanc.
Combiner avec un twirl
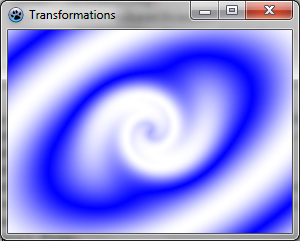
Nous pouvons ajouter une autre transformation comme cela : <delphi>var image: TBGRABitmap;
   grad: TBGRAGradientScanner;
   affine: TBGRAAffineScannerTransform;
   twirl: TBGRATwirlScanner;
begin
image := TBGRABitmap.Create(ClientWidth,ClientHeight, BGRABlack );
grad := TBGRAGradientScanner.Create(BGRA(0,0,255),BGRAWhite,gtRadial,PointF(0,0),PointF(1,0),True,True);
 affine := TBGRAAffineScannerTransform.Create(grad);
 affine.Scale(150,80);
 affine.RotateDeg(-30);
 affine.Translate(ClientWidth/2, ClientHeight/2);
 twirl := TBGRATwirlScanner.Create(affine,Point(ClientWidth div 2, ClientHeight div 2),100);
 image.Fill(twirl);
 twirl.Free;
 affine.free;
 grad.free;
 image.Draw(Canvas,0,0,True);
 image.free;
end; </delphi>
Ici, nous créons une transformation de twirl et l'appliquons à la précédente.
Exécution du programme
A présent, le centre du dégradé est tourbillonnant.
Utiliser un scanner personnalisé
Nous pouvons avoir besoin de créer notre propre générateur de dégradés. Voici par exemple un dégradé multiplicateur : <delphi>type
{ TBGRAMultiplyScanner }
 TBGRAMultiplyScanner = class(TBGRACustomScanner)
   function ScanAt(X, Y: Single): TBGRAPixel; override;
 end;
{ TBGRAMultiplyScanner }
function TBGRAMultiplyScanner.ScanAt(X, Y: Single): TBGRAPixel;
 function cycle512(value: integer): integer; inline;
 begin
   result := value and 511;
   if result >= 256 then result := 511-result;
 end;
var
mul: integer;
begin
 mul := cycle512(round(x*y));
 result := BGRA(mul,mul,mul,255);
end; </delphi>
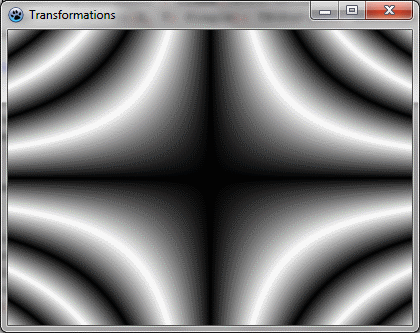
Il est dérivé de TBGRACustomScanner afin d'être utilisé pour le remplissage, et la fonction ScanAt est remplacée (override). Elle calcule le produit des deux coordonnées et fait un cycle de 512 (de 0 à 255 puis de 255 à 0).
Dessinons-le à l'écran avec une simple transformation affine : <delphi>var image: TBGRABitmap;
   grad: TBGRAMultiplyScanner;
   affine: TBGRAAffineScannerTransform;
begin
image := TBGRABitmap.Create(ClientWidth,ClientHeight, BGRABlack );
 grad := TBGRAMultiplyScanner.Create;
 affine := TBGRAAffineScannerTransform.Create(grad);
 affine.Scale(6,4);
 affine.Translate(ClientWidth/2, ClientHeight/2);
 image.Fill(affine);
 affine.free;
 grad.free;
 image.Draw(Canvas,0,0,True);
 image.free;
end; </delphi>
Exécution du programme
Cela devrait ressembler à cela :
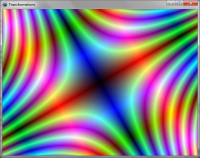
Rendons cela joli
Ajoutez des couleurs et modifiant la procédure ScanAt du dégradé multiplicateur : <delphi>var
mul: integer;
begin
 mul := round(x*y);
 result := BGRA(cycle512(round(x*10)),cycle512(mul),cycle512(round(y*10)),255);
end; </delphi>
Les intensités rouge et bleue sont définie avec un cycle des positions x et y.
Enfin ajoutez une rotation : <delphi> affine := TBGRAAffineScannerTransform.Create(grad);
 affine.Scale(6,4);
 affine.RotateDeg(-30);
 affine.Translate(ClientWidth/2, ClientHeight/2); </delphi>
Tutoriel précédent (plaquage de texture) Tutoriel suivant (fonctions texte)


