Difference between revisions of "KOL-CE/fr"
| Line 47: | Line 47: | ||
== Using MCK == | == Using MCK == | ||
| − | === | + | === Création d'un projet MCK === |
[[Image:MCKForm.png|right|MCK form]] | [[Image:MCKForm.png|right|MCK form]] | ||
| − | # | + | # Lancer Lazarus et créer une nouvelle application en utilisant le menu '''Fichier > Nouveau...'''. |
| − | # | + | # NE PAs placer de composant dans la fiche à ce niveau. Choisir '''Fichier > Tout enregistrer''' et sélectionner le dossier de destination pour votre projet. Noter que TOUS LES FICHIERS de votre projet DEVRONT TOUJOURS ETRE PLACES DANS LE MEME DOSSIER! Vous pouvez changer le nom de l'unité de la fiche, mais pas celui du projet. Laisser le nom du projet par défaut <tt>project1.lpi</tt> |
| − | # | + | # Placer le composant <tt>'''TKOLProject'''</tt> dans la fiche. |
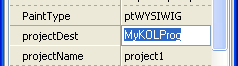
| − | # | + | # Donner un nom au projet MCK résultant en modifiant la propriété <tt>'''ProjectDest'''</tt> (le chemin NE DOIT PAS être inclus). Si vous saisissez <tt>MyKOLProg</tt>, par exemple, alors le projet MCK résultant sera nommé <tt>MyKOLProg.lpi</tt>. Le nom du fichier EXE sera (comme vous l'avez déjà deviné) <tt>MyKOLProg.exe</tt>.<br>[[Image:KOLProjectDest.png||ProjectDest property]] |
| − | # | + | # Placer le composant <tt>'''TKOLForm'''</tt> dans la fiche. |
| − | # | + | # Enregistrer le projet courant. |
| − | # | + | # Ouvrir le projet résultant que vous avez spécifié dans la propriété <tt>'''ProjectDest'''</tt> (<tt>MyKOLProg.lpi</tt> dans notre exemple, il doit se trouver dans le même dossier). Après cela, vous povez détruire tous les fichiers <tt>project1.*</tt> - ces fichiers n'étant plus nécessaires. |
# Play with your new KOL/MCK Project (adjust Parameters, drop TKOL... components, compile, run, debug, etc.) Enjoy! | # Play with your new KOL/MCK Project (adjust Parameters, drop TKOL... components, compile, run, debug, etc.) Enjoy! | ||
Revision as of 13:08, 1 January 2005
Cet article s'applique uniquement à Windows.
Voir aussi: Multiplatform Programming Guide/fr
Cet article s'applique uniquement à Windows CE.
Voir aussi: Multiplatform Programming Guide/fr
│
English (en) │
français (fr) │
한국어 (ko) │
русский (ru) │
中文(中国大陆) (zh_CN) │
中文(台灣) (zh_TW) │
Introduction
KOL-CE est le portage pour Free Pascal/Lazarus de KOL&MCK développé par Vladimir Kladov (http://kolmck.net). KOL-CE est développé par Yury Sidorov et est distribué sous licence wxWindows Library Licence.
KOL-CE permet de créer des applications Win32/WinCE très compactes (à partir de ~40Koctets pour un projet avec une form vide).
MCK est un paquet Lazarus permettant le développement VISUEL de projet KOL-CE avec l'IDE Lazarus.
Initialement, KOL-CE était planifié pour être seulement une portage de KOL pour WinCE. Mais, ultérieurement, il a été décidé de conserver les fonctionnalités Win32 et de le faire fonctionner avec FPC sans problème. La version original de KOL est prévue pour Delphi et ne fonctionne pas correctement avec FPC. La version originale de MCK ne peut pas être utilisée avec Lazarus.
Requirements
- Free Pascal compiler 2.2.0 ou ultérieur pour Win32.
- arm-wince cross compiler 2.2.0 ou ultérieur pour Win32 (pour développement [[WinCE port|WinCE]).
- Lazarus 0.9.23 ou ultérieur pour Win32.
Cibles supportées
- Toutes versions 32bits de Windows: de Windows 95 à Vista.
- Pocket PC et smartphones basés sur Windows CE.
Téléchargement
Télécharger la dernière release de KOL-CE ici.
Vous pouvez aussi obtenir les sources de KOL-CE les plus récentes via svn en utilisant ce lien : https://kol-ce.svn.sourceforge.net/svnroot/kol-ce/trunk
Installation
Si vous utilisez Lazarus 0.9.25 ou une version ultérieur, vous devez reconstruire Lazarus avec l'option DisableFakeMethods avant l'installation du paquet MCK.
Pour cela :
- Lancer Lazarus.
- Choisir le menu Outils > Configurer "Build Lazarus"... menu item.
- Choisir Clean Up + Build all dans l'onglet Options de construction rapide.
- Ouvrir l'onglet Options de construction avancées et ajouter -dDisableFakeMethods dans le champ Options.
- Cliquer sur le bouton Construire pour reconstruire Lazarus.

- Télécharger les sources de KOL-CE et placer les dans un répertoire de votre système de fichiers.
- Lancer Lazarus et choisir le menu Composants > Ouvrir un fichier paquet (.lpk). Se placer dans le dossier MCK et choisir le fichier MirrorKOLPackage.lpk.
- La fen^tre de gestion des paquet s'ouvre. Cliquer sur le bouton Installer.
- Lazarus compile alors le paquet MCK et l'IDE sera redémarrée.
- Après le redémarrage, un onglet KOL apparaît dans la palette de composants.

NOTE: Si vous n'arrivez pas à voir tous les composants KOL sur la palette, ajuster verticalement la taille de la palette de composants. Vous verrez alors la seconde ligne des composants de l'onglet KOL (comme sur la copie d'écran ci-dessus).
MCK package upgrade is very simple as well. Just overwrite KOL-CE sources with new version, open MCK package and press Install button to recompile the package.
Using MCK
Création d'un projet MCK

- Lancer Lazarus et créer une nouvelle application en utilisant le menu Fichier > Nouveau....
- NE PAs placer de composant dans la fiche à ce niveau. Choisir Fichier > Tout enregistrer et sélectionner le dossier de destination pour votre projet. Noter que TOUS LES FICHIERS de votre projet DEVRONT TOUJOURS ETRE PLACES DANS LE MEME DOSSIER! Vous pouvez changer le nom de l'unité de la fiche, mais pas celui du projet. Laisser le nom du projet par défaut project1.lpi
- Placer le composant TKOLProject dans la fiche.
- Donner un nom au projet MCK résultant en modifiant la propriété ProjectDest (le chemin NE DOIT PAS être inclus). Si vous saisissez MyKOLProg, par exemple, alors le projet MCK résultant sera nommé MyKOLProg.lpi. Le nom du fichier EXE sera (comme vous l'avez déjà deviné) MyKOLProg.exe.
- Placer le composant TKOLForm dans la fiche.
- Enregistrer le projet courant.
- Ouvrir le projet résultant que vous avez spécifié dans la propriété ProjectDest (MyKOLProg.lpi dans notre exemple, il doit se trouver dans le même dossier). Après cela, vous povez détruire tous les fichiers project1.* - ces fichiers n'étant plus nécessaires.
- Play with your new KOL/MCK Project (adjust Parameters, drop TKOL... components, compile, run, debug, etc.) Enjoy!

Adding a form
- Select File > New form menu item.
- Save the form IN THE SAME directory where project is located.
- Drop TKOLForm object onto it.
- Be sure that you have TKOLApplet component dropped on the main form.
- If AutoBuild is turned off: select TKOLProject component in main form and double click its property Build. (Otherwise, all should be done already, isn't it?).
Writing code
Do not use names from RTL/FCL/LCL, especially from SysUtils, Classes, Forms, etc. All what you need, you should find in KOL, Windows, Messages units. And may be, write by yourself (or copy from another sources). When you write code in mirror project - usually place it in event handlers. You also can add any code where you wish but avoid changing first section of your mirror LCL form class declaration. And do not change auto-generated inc-files. Always remember, that code, that you write in mirror project, must be accepted both by LCL and KOL. By LCL - at the stage of compiling mirror project (and this is necessary, because otherwise converting mirror project to reflected KOL project will not be possible). And by KOL - at the stage of compiling written code in KOL namespace.
IMPORTANT
To resolve conflict between words LCL.Self and KOL.@Self, which are interpreted differently in KOL and LCL, special field is introduced - Form. In LCL, Form property of TKOLForm component "returns" Self, i.e. form object itself. And in KOL, Form: PControl is a field of object, containing resulting form object. Since this, it is correctly to change form's properties in following way:
Form.Caption := 'Hello!';
(Though old-style operator Caption := 'Hello!'; is compiled normally while converting mirror project to KOL, it will be wrong in KOL environment). But discussed above word Form is only to access form's properties - not its child controls. You access child controls and form event handlers by usual way. e.g.:
Button1.Caption := 'OK';
Button1Click(Form);
Run-time form creation
It is possible to create several instances of the same form at run-time. And at least, it is possible to make form not AutoCreate, and create it programmatically when needed. Use global function NewForm1 (replacing Form1 with your mirror form name), for instance:
TempForm1 := NewForm1( Applet );
To make this possible, NEVER access global variable created in the unit during conversation, unless You know why You are doing so. Refer to Form variable instead.
WinCE
Setup

You need to install arm-wince cross compiler for Win32 to compile WinCE executables. Get it here.
To compiler for arm-wince target open compiler options of your project using Project > Compiler options... menu item. Open Code tab and change target platform to arm-wince.
NOTE: You can receive the following error while compiling your KOL-CE project for WinCE:
Compiling resource KOL-CE.rc
arm-wince-windres.exe: no resources
KOL.PAS(57901) Error: Error while linking
KOL.PAS(57901) Fatal: There were 1 errors compiling module, stopping
In such case you need to edit Windows PATH environment variable and add path to folder where win32 fpc binaries are located.
To find out which path to add, go to Environment options in Lazarus and see compiler path.
Quit Lazarus before editing PATH.
To edit PATH variable right click on My Computer icon go to Advanced tab and click Environment Variables button.
Hints and notes
- To make form fullscreen as most Pocket PC applications have, don't change the form position and size. If form size and/or position was changed the form will look like dialog with caption and close button. In MCK set defaultSize and defaultPosition of TKOLForm to True to make form fullscreen.
Known issues
- The following components are not supported: RichEdit, TrayIcon.
- Only gsVertical, gsHorizontal gradient panel styles are supported.
- Text alignment does not work in single line edit control. Use memo if you need text alignment.
Documentation
- Visit official KOL&MCK website for documentation and information: http://kolmck.net
- Read MCK documentation in KOLmirrorReadme.txt file inside MCK folder.
KOL-CE in real-world applications
See also
- Official KOL&MCK website http://kolmck.net
- KOL-CE page at SourceForge http://sourceforge.net/projects/kol-ce/
- WinCE port of Free Pascal
- Windows CE Interface
- Windows CE Development Notes
Contacts
Report bugs, submit patches and ask questions at project's page at SourceForge: http://sourceforge.net/projects/kol-ce/