Difference between revisions of "TListBox/ja"
| (33 intermediate revisions by the same user not shown) | |||
| Line 10: | Line 10: | ||
==リストボックスを埋める== | ==リストボックスを埋める== | ||
| − | === | + | ===オブジェクトインスペクタにより=== |
* フォーム上のListBoxを1回のクリックで選択する。 | * フォーム上のListBoxを1回のクリックで選択する。 | ||
* PropertiesタブでObject Inspectorに移動し、''Items''というプロパティを選択する。 | * PropertiesタブでObject Inspectorに移動し、''Items''というプロパティを選択する。 | ||
| − | * | + | * 3つの点があるボタンをクリックする。String Editorが開く。 |
* テキストを入力し、''OK''で作業を確認する。 | * テキストを入力し、''OK''で作業を確認する。 | ||
| − | === | + | ===ボタンクリックでコードにより=== |
| − | + | フォームに、名前が''btnFill''でキャプションが''fill ListBox''となる[[TButton]]を追加する。そのボタンの''OnClick''イベントハンドラには、以下のコードを記述する: | |
<syntaxhighlight lang=pascal> | <syntaxhighlight lang=pascal> | ||
procedure TForm1.btnFillClick(Sender: TObject); | procedure TForm1.btnFillClick(Sender: TObject); | ||
| Line 29: | Line 29: | ||
</syntaxhighlight> | </syntaxhighlight> | ||
| − | == | + | ==StringListの割り当て== |
| − | + | フォームに、名前が''btnFill''でキャプションが''fill ListBox''となる[[TButton/ja]]を追加する。そのボタンの''OnClick''イベントハンドラには、以下のコードを記述する: | |
<syntaxhighlight lang=pascal> | <syntaxhighlight lang=pascal> | ||
procedure TForm1.btnFillClick(Sender: TObject); | procedure TForm1.btnFillClick(Sender: TObject); | ||
| Line 36: | Line 36: | ||
myStringList: TStringList; | myStringList: TStringList; | ||
begin | begin | ||
| − | myStringList:=TStringList.Create; // | + | myStringList:=TStringList.Create; //StringListを作る |
| − | myStringList.Add('This is the first line.'); // | + | myStringList.Add('This is the first line.'); //新しい行を追加する |
myStringList.Add('This is the second first line.'); | myStringList.Add('This is the second first line.'); | ||
myStringList.Add('This is the third line.'); | myStringList.Add('This is the third line.'); | ||
myStringList.Add('etc.'); | myStringList.Add('etc.'); | ||
| − | ListBox1.Items.Assign(myStringList); // | + | ListBox1.Items.Assign(myStringList); //ListBox1にStringListの内容を割り当てる |
| − | myStringList.Free; // | + | myStringList.Free; //メモリからStringListを解放する |
end; | end; | ||
</syntaxhighlight> | </syntaxhighlight> | ||
| − | == | + | ==文字列を追加する== |
| − | * | + | * [[TListBox/ja#ボタンクリックでコードにより|ボタンクリックでコードにより]]埋める、を拡張し、TEditと名前が''btnAdd''でキャプションが''add string''のTButtonを追加し、''Edit1''のTextプロパティを"" - 空の文字列に変更する。 |
| − | * | + | * ボタンのイベントハンドラ''OnClick''に以下のコードを書く: |
<syntaxhighlight lang=pascal> | <syntaxhighlight lang=pascal> | ||
procedure TForm1.btnAddClick(Sender: TObject); | procedure TForm1.btnAddClick(Sender: TObject); | ||
| Line 57: | Line 57: | ||
</syntaxhighlight> | </syntaxhighlight> | ||
| − | == | + | ==文字列を削除する== |
| − | |||
| − | + | デフォルトでは、ListBoxで1行のみを選択できるように設定されている。ListBoxで複数の行を選択する場合は、''MultiSelect''プロパティを''True''に設定する必要がある。 | |
| − | * | + | ===ItemIndexで=== |
| − | * | + | |
| + | * [[TListBox/ja#文字列を追加する|文字列を追加する]]を拡張し"btnDel"の名前の[[TButton/ja|TButton]]、そのキャプションを"delete string"とする。 | ||
| + | * ボタンの''OnClick''イベントハンドラに以下のコードを書く: | ||
<syntaxhighlight lang=pascal> | <syntaxhighlight lang=pascal> | ||
procedure TForm1.btnDelClick(Sender: TObject); | procedure TForm1.btnDelClick(Sender: TObject); | ||
begin | begin | ||
| − | if ListBox1.ItemIndex > -1 then // | + | if ListBox1.ItemIndex > -1 then //リストボックスの文字列が選択されたときのみ削除 |
ListBox1.Items.Delete(ListBox1.ItemIndex); | ListBox1.Items.Delete(ListBox1.ItemIndex); | ||
end; | end; | ||
| Line 73: | Line 74: | ||
===all selected strings=== | ===all selected strings=== | ||
| − | * | + | * [[TListBox/ja#文字列を追加する|文字列を追加する]]を拡張し"btnDel"の名前の[[TButton/ja|TButton]]、そのキャプションを"delete string"とする。 |
| − | * | + | * ボタンの''OnClick''イベントハンドラに以下のコードを書く: |
<syntaxhighlight lang=pascal> | <syntaxhighlight lang=pascal> | ||
procedure TForm1.btnDelClick(Sender: TObject); | procedure TForm1.btnDelClick(Sender: TObject); | ||
| Line 80: | Line 81: | ||
i: Integer; | i: Integer; | ||
begin | begin | ||
| − | if ListBox1.SelCount > 0 then // | + | if ListBox1.SelCount > 0 then //リストボックスの少なくとも1つの文字列が選択されたときのみ削除する |
| − | for i:=ListBox1.Items.Count - 1 downto 0 do // | + | for i:=ListBox1.Items.Count - 1 downto 0 do //すべてのアイテムをイテレート |
| − | if ListBox1.Selected[i] then // | + | if ListBox1.Selected[i] then //もし選択されたら... |
| − | ListBox1.Items.Delete(i); //... | + | ListBox1.Items.Delete(i); //...そのアイテム(文字列)を削除 |
end; | end; | ||
</syntaxhighlight> | </syntaxhighlight> | ||
| − | == | + | ==所有者によって書かれたリストボックス== |
| − | + | 一般的には、リストボックスをユーザーによって設定された[http://en.wikipedia.org/wiki/Skin_%28computing%29 テーマ]に従わせることが有効である。ある場合(例えば、色彩の多い表面を持つゲームをプログラムするため)ではこの標準から逸脱し、自身の選択に従ってコントロールを描くことができる。 | |
| − | * | + | これを、 |
| − | * | + | * 上の例を変更するか、TListBox ''ListBox1''をもつ新しいアプリケーションを作る |
| − | * | + | * オブジェクトインスペクタで''ListBox1''のプロパティ、''Style''を''lbOwnerDrawFixed''へ変更する。 |
| − | * | + | * オブジェクトインスペクタのイベントタブで[...]ボタンをクリックすることで、''OnDrawItem''イベントに対するイベントハンドラを作る。 |
| + | * イベントハンドラに以下のコードを加える: | ||
<syntaxhighlight lang=pascal> | <syntaxhighlight lang=pascal> | ||
procedure TForm1.ListBox1DrawItem(Control: TWinControl; Index: Integer; | procedure TForm1.ListBox1DrawItem(Control: TWinControl; Index: Integer; | ||
ARect: TRect; State: TOwnerDrawState); | ARect: TRect; State: TOwnerDrawState); | ||
var | var | ||
| − | aColor: TColor; // | + | aColor: TColor; //背景色 |
begin | begin | ||
| − | if (Index mod 2 = 0) // | + | if (Index mod 2 = 0) //インデクスがどのアイテムか知らせる |
| − | then aColor:=$FFFFFF // | + | then aColor:=$FFFFFF //背景色として1秒ごとにアイテムが白になる |
| − | else aColor:=$EEEEFF; // | + | else aColor:=$EEEEFF; //背景色として1秒ごとにアイテムが桃になる |
| − | if odSelected in State then aColor:=$0000FF; // | + | if odSelected in State then aColor:=$0000FF; //もしアイテムが選択されると、背景色は赤となる。 |
| − | ListBox1.Canvas.Brush.Color:=aColor; // | + | ListBox1.Canvas.Brush.Color:=aColor; //背景色を設定する |
| − | ListBox1.Canvas.FillRect(ARect); // | + | ListBox1.Canvas.FillRect(ARect); //塗りつぶされた四角形を描く |
| − | ListBox1.Canvas.Font.Bold:=True; // | + | ListBox1.Canvas.Font.Bold:=True; //フォントを「太字」に設定する |
| − | ListBox1.Canvas.TextRect(ARect, 2, ARect.Top+2, ListBox1.Items[Index]); // | + | ListBox1.Canvas.TextRect(ARect, 2, ARect.Top+2, ListBox1.Items[Index]); //アイテムテキストを描く |
end; | end; | ||
</syntaxhighlight> | </syntaxhighlight> | ||
| − | {{Note|''' | + | と書くことができる。 |
| − | '''Control:'''<br> | + | {{Note|'''リストボックスアイテムのパラメータ:'''<br><br>'''Control:'''<br>複数のコントロール(例えば、複数のリストボックス)がこのハンドルにアクセスする場合、どれがこのイベントを発生させたかわかる。それがTListBoxかどうか、'''<syntaxhighlight lang=pascal>ListBox1.Canvas.FillRect(ARect)</syntaxhighlight>'''また、'''<syntaxhighlight lang=pascal>TListBox(Control).Canvas.FillRect(ARect)</syntaxhighlight>'''の代わりに、事前に問い合わせるべきであり<syntaxhighlight lang=pascal>if Control is TListBox then |
| − | <syntaxhighlight lang=pascal> | + | TListBox(Control).Canvas.FillRect(ARect); |
| − | + | </syntaxhighlight>と書くことができる。 | |
| − | TListBox(Control).Canvas.FillRect(ARect); | ||
| − | </syntaxhighlight> | ||
'''Index:''' | '''Index:''' | ||
| − | + | アクセスできるように、アイテムの場所を特定する | |
| + | '''<syntaxhighlight lang=pascal><ListBox>.Items[Index]</syntaxhighlight>'''.<br> | ||
'''ARect:''' | '''ARect:''' | ||
| − | + | 背景を描くために必要な、四角形を描写する。<br> | |
'''State:''' | '''State:''' | ||
| − | + | 通常、フォーカスされた、選択されたなどアイテムの状態。 | |
}} | }} | ||
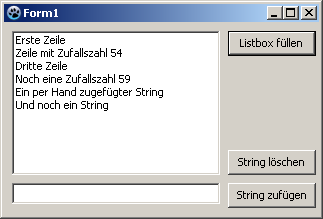
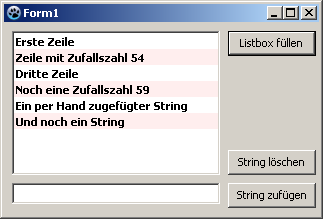
| − | * | + | * 例では以下のように見えるはずである: |
[[image:ListBoxBsp1.png]] -> [[image:ListBoxBsp2.png]] | [[image:ListBoxBsp1.png]] -> [[image:ListBoxBsp2.png]] | ||
Latest revision as of 02:44, 22 March 2024
│
Deutsch (de) │
English (en) │
suomi (fi) │
français (fr) │
日本語 (ja) │
TListBox ![]() は、ユーザーが1つ選択する必要がある(スクロール可能な)短い文字列のリストを表示するコンポーネントである。コンポーネントパレットのStandardタブで利用できる。
は、ユーザーが1つ選択する必要がある(スクロール可能な)短い文字列のリストを表示するコンポーネントである。コンポーネントパレットのStandardタブで利用できる。
TListBoxにあるstringsはTStrings型であるItemsプロパティに格納されている。そのため、TStringListまたはその親であるTStringsにあるように、リストボックス内に文字列を割り当て、もしくは取り除くことができる。
これはForm1のTListBox ListBox1の使い方のいくつかの例である:
リストボックスを埋める
オブジェクトインスペクタにより
- フォーム上のListBoxを1回のクリックで選択する。
- PropertiesタブでObject Inspectorに移動し、Itemsというプロパティを選択する。
- 3つの点があるボタンをクリックする。String Editorが開く。
- テキストを入力し、OKで作業を確認する。
ボタンクリックでコードにより
フォームに、名前がbtnFillでキャプションがfill ListBoxとなるTButtonを追加する。そのボタンのOnClickイベントハンドラには、以下のコードを記述する:
procedure TForm1.btnFillClick(Sender: TObject);
begin
  ListBox1.Items.Clear;             //Delete all existing strings
  ListBox1.Items.Add('First line');
  ListBox1.Items.Add('Line with random number '+IntToStr(Random(100)));
  ListBox1.Items.Add('Third line');
  ListBox1.Items.Add('Even a random number '+IntToStr(Random(100)));
end;
StringListの割り当て
フォームに、名前がbtnFillでキャプションがfill ListBoxとなるTButton/jaを追加する。そのボタンのOnClickイベントハンドラには、以下のコードを記述する:
procedure TForm1.btnFillClick(Sender: TObject);
var
  myStringList: TStringList;
begin
  myStringList:=TStringList.Create;               //StringListを作る
  myStringList.Add('This is the first line.');   //新しい行を追加する
  myStringList.Add('This is the second first line.');
  myStringList.Add('This is the third line.');
  myStringList.Add('etc.');
  ListBox1.Items.Assign(myStringList);            //ListBox1にStringListの内容を割り当てる
  myStringList.Free;                              //メモリからStringListを解放する
end;
文字列を追加する
- ボタンクリックでコードにより埋める、を拡張し、TEditと名前がbtnAddでキャプションがadd stringのTButtonを追加し、Edit1のTextプロパティを"" - 空の文字列に変更する。
- ボタンのイベントハンドラOnClickに以下のコードを書く:
procedure TForm1.btnAddClick(Sender: TObject);
begin
  ListBox1.Items.Add(Edit1.Text);
  Edit1.Text:='';
end;
文字列を削除する
デフォルトでは、ListBoxで1行のみを選択できるように設定されている。ListBoxで複数の行を選択する場合は、MultiSelectプロパティをTrueに設定する必要がある。
ItemIndexで
procedure TForm1.btnDelClick(Sender: TObject);
begin
  if ListBox1.ItemIndex > -1 then    //リストボックスの文字列が選択されたときのみ削除
    ListBox1.Items.Delete(ListBox1.ItemIndex);
end;
all selected strings
procedure TForm1.btnDelClick(Sender: TObject);
var
  i: Integer;
begin
  if ListBox1.SelCount > 0 then                 //リストボックスの少なくとも1つの文字列が選択されたときのみ削除する
    for i:=ListBox1.Items.Count - 1 downto 0 do //すべてのアイテムをイテレート
      if ListBox1.Selected[i] then              //もし選択されたら...
        ListBox1.Items.Delete(i);               //...そのアイテム(文字列)を削除
end;
所有者によって書かれたリストボックス
一般的には、リストボックスをユーザーによって設定されたテーマに従わせることが有効である。ある場合(例えば、色彩の多い表面を持つゲームをプログラムするため)ではこの標準から逸脱し、自身の選択に従ってコントロールを描くことができる。 これを、
- 上の例を変更するか、TListBox ListBox1をもつ新しいアプリケーションを作る
- オブジェクトインスペクタでListBox1のプロパティ、StyleをlbOwnerDrawFixedへ変更する。
- オブジェクトインスペクタのイベントタブで[...]ボタンをクリックすることで、OnDrawItemイベントに対するイベントハンドラを作る。
- イベントハンドラに以下のコードを加える:
procedure TForm1.ListBox1DrawItem(Control: TWinControl; Index: Integer;
  ARect: TRect; State: TOwnerDrawState);
var
  aColor: TColor;                       //背景色
begin
  if (Index mod 2 = 0)                  //インデクスがどのアイテムか知らせる
    then aColor:=$FFFFFF                //背景色として1秒ごとにアイテムが白になる
    else aColor:=$EEEEFF;               //背景色として1秒ごとにアイテムが桃になる
  if odSelected in State then aColor:=$0000FF;  //もしアイテムが選択されると、背景色は赤となる。
  ListBox1.Canvas.Brush.Color:=aColor;  //背景色を設定する
  ListBox1.Canvas.FillRect(ARect);      //塗りつぶされた四角形を描く

  ListBox1.Canvas.Font.Bold:=True;      //フォントを「太字」に設定する
  ListBox1.Canvas.TextRect(ARect, 2, ARect.Top+2, ListBox1.Items[Index]);  //アイテムテキストを描く
end;
と書くことができる。
Control:
複数のコントロール(例えば、複数のリストボックス)がこのハンドルにアクセスする場合、どれがこのイベントを発生させたかわかる。それがTListBoxかどうか、
ListBox1.Canvas.FillRect(ARect)
TListBox(Control).Canvas.FillRect(ARect)
if Control is TListBox then
    TListBox(Control).Canvas.FillRect(ARect);
Index: アクセスできるように、アイテムの場所を特定する
<ListBox>.Items[Index]
ARect:
背景を描くために必要な、四角形を描写する。
State:
通常、フォーカスされた、選択されたなどアイテムの状態。
- 例では以下のように見えるはずである:
See also

